

[Reading time: 6 minutes]
Overview
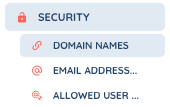
The Security tab sits in the Maker, in the client account settings. Open your user capsule, click Client account settings, then Security in the left-hand menu.
For an overview of the client account settings and all of its tabs, see the Client account settings article.
It gathers three sub-tabs, answering three different questions:
- Domain names: which websites can reach your account.
- Email address domains: which domains your mailboxes are built on.
- Allowed user domain names: which domains you can create your users’ addresses with.
Warning: all three lists are about domain names but they serve completely different purposes, and they do not talk to each other. Adding a domain in one does not add it to the others.
1. Prerequisites
- The read right on at least one of the three items must be enabled on your role for the Security tab to appear. Each sub-tab then follows its own read right: you only see the ones your role allows.
- The create right to add, and the delete right to remove, on the item concerned.
2. Open the Security tab
- In the Maker, open your user capsule and click Client account settings.
- In the left-hand menu, click Security, then pick the sub-tab you need.
3. Domain names
3.1. What this list is for
Declare your website’s domain name here. INO cx then accepts the exchanges coming from that site, and allows its own pages to be displayed inside your pages. This is what lets a chat module installed on your site talk to your account.
A site whose domain is not in this list is not allowed to exchange with your account.
3.2. Add a domain name
- Click Create.
- Enter the Domain name, in the
example.comformat, with nohttps://and no path. A wrong format shows “The domain name must be in the format ‘example.com’.”, and an empty field “The domain name is required.”. - Confirm. The message “The domain name has been successfully created.” confirms the addition.
3.3. Modify or delete
Each line can be modified or deleted. You can also select several lines to delete them at once.
Note: deleting a domain cuts the exchanges coming from the matching site. If a chat module is installed there, it stops working.
4. Email address domains
4.1. What this list is for
These are the domains your mailboxes are built on. When you create a mailbox, you pick its domain from this list.
Sending emails from INO cx is set up with the help of support: send a request and the team will walk you through the next steps. Receiving is configured through the mailboxes you build on these domains. The redirect alias to give to your mail server is provided when each mailbox is created, see the Mailboxes article.
Warning: an email address domain can get banned very easily through fraudulent use. Keep an eye on what goes out from your mailboxes.
4.2. Consult the list
The sub-tab shows the domains already in place. There is no add button and no edit button in the interface: an email address domain is set up by the INO cx teams. Go through support to obtain a new one.
4.3. Delete a domain
Deletion is possible, on one line or several at once. A domain still used by mailboxes cannot be deleted: the message “You cannot delete the Email address domain entity because it is used by other items.” appears. The See dependencies entry then shows you what relies on it.
4.4. The blacklisted email addresses of a domain
Click a domain name to open the list of blacklisted email addresses attached to it. A blacklisted address no longer receives your emails. The table has five columns:
| Column | Content |
|---|---|
| Creation date | When the address was blacklisted. |
| Email address to blacklist | The blocked recipient: the address that will no longer receive your emails. |
| Type | The reason for the blacklisting: Permanent failure, Complaint, Manual or Unsubscribe. |
| Blacklisting mailbox | Which of your own mailboxes the block applies from. Either one specific mailbox of the domain, or All domain mailboxes. |
| Added by | The person who added the address, or “System” when the blacklisting is automatic. |
The four types read as follows:
- Permanent failure: several possible reasons, the address is invalid, the domain does not exist, or the email was rejected for good by the recipient’s server.
- Complaint: the recipient deemed the email undesirable.
- Manual: the address was blacklisted by hand from this screen.
- Unsubscribe: the address was blacklisted following a request to unsubscribe.
To blacklist an address yourself, click Create, enter the Email address to blacklist, then choose the Blacklisting mailbox: either one specific mailbox of the domain, or All domain mailboxes. A line can then be deleted to unblock the address, but not modified.
5. Allowed user domain names
This sub-tab requires a Smart licence.
5.1. What this list is for
These are the domains you can create your users’ addresses with. On a user’s page, the Email field is filled in two parts: you type what comes before the at sign, and you pick the domain from this list. A domain that is not here is therefore not offered when creating a user.
5.2. Add an allowed user domain name
- Click Create.
- Enter the Domain name, following the example shown in the field.
- Confirm. The message “The user domain name has been successfully created.” confirms the addition.
5.3. Delete an allowed user domain name
Deletion is possible, but two rules apply:
- A domain that still has users attached to it cannot be deleted. Move or delete those users first.
- At least one domain must remain in the list. The last one cannot be deleted.
In both cases, the message “Unable to delete the user domain name.” appears. The lines concerned offer the See dependencies entry so you can identify what is holding them.
An existing line cannot be modified: to change a domain, add the new one then delete the old one.
Note: the number of domain names is capped, in all three lists. When you reach a limit, the Limit reached window opens as you create. See the Limits article to request an increase.