
[Reading time: 5 minutes]
Overview
A mailbox in INO cx is an email identity used to receive and send emails through the platform. Each mailbox is defined by a display name and an email address, composed of a local part and one of the email domains configured in your organisation.
Mailboxes are managed from the Maker > Endpoints > Mailboxes submodule. When you create a mailbox, INO cx generates a unique alias (for example abc123@yourdomain.ino.cx). You must then configure a forwarding rule in your email provider so that messages sent to your real email address are redirected to this alias — this is how emails reach the INO cx platform.
Once configured, mailboxes can be linked to one or more distribution queues. Each queue has a default mailbox used as the sender address for outgoing emails from that queue.
Limit: up to 50 mailboxes per organisation.
1. Prerequisites
Before creating a mailbox, make sure the following elements are in place:
- Email domain configured — at least one email domain must be set up in your INO cx platform. This is the domain that will appear after the
@in your mailbox address. Note: Email adress domains are configured in the client account settings. - Smart routing (optional) — if you plan to route incoming emails through a smart routing flow, create the smart routing beforehand so it is available for selection during mailbox creation.
- Access to your email provider — you will need admin access to your email provider (Google Workspace, Microsoft 365, etc.) to configure the forwarding rule that redirects emails to the INO cx alias.
- Distribution queue (optional) — if you want agents to handle emails, have at least one distribution queue ready to link to the mailbox.
2. Accessing mailboxes
To manage mailboxes:
- Open the Maker
- In the side menu, click Mailboxes
The page displays all existing mailboxes in a list.

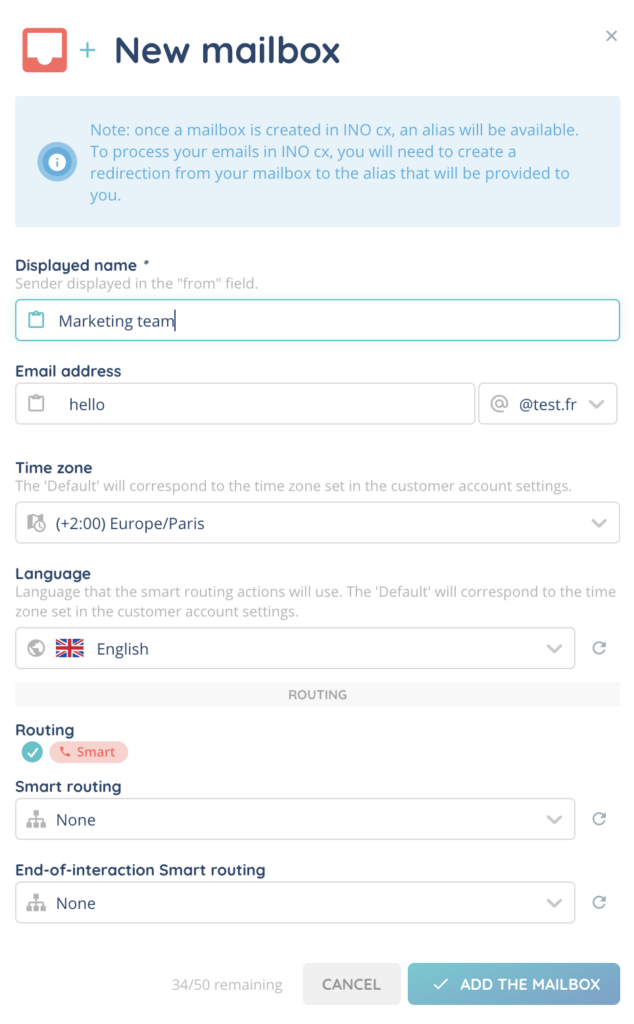
3. Creating a mailbox
To create a new mailbox:
- From the mailboxes list, click Create
- Fill in the required information (see table below)
- Click Save
INO CX automatically generates a unique alias for the mailbox.
| Field | Description |
|---|---|
| Display name | The sender name shown in the “From” field of outgoing emails. Required. Max 255 characters. |
| Email address (local part) | The part before the @. Must be lowercase only. Required. |
| Email domain | The domain selected from the list of email domains configured in the platform. Required. |
| Timezone | Per-mailbox timezone override. If set to “Default”, the organisation’s timezone is used. |
| Language | Per-mailbox language setting. Affects the language of automated messages and logs. |
| Routing | Only Smart Routing is available. Incoming emails are processed by a smart routing flow before being distributed. |
| Smart Routing | The email smart routing to apply to incoming messages. Can be set to “None” (no routing). |
| Smart Routing version | Whether the selected smart routing runs in Production (live version) or Test mode (draft version). Only displayed when a smart routing is selected. |
| End Smart Routing | Optional. A smart routing triggered at the end of an email interaction (post-processing flow). |
| End Smart Routing version | Production or Test mode for the end smart routing. |
4. Setting up the email redirect (alias)
After creating a mailbox, you must configure a forwarding rule in your email provider so that messages sent to your real address are delivered to the INO cx platform. Without this step, the mailbox will not receive any emails.
- Open the mailbox you just created and locate the alias displayed in the detail view (for example
abc123@yourdomain.ino.cx). You can also access it via the info button labelled “Configure your mailbox in INO cx”. - Copy the alias to your clipboard.
- Sign in to your email provider’s admin console (Google Workspace, Microsoft 365, or other).
- Set up a forwarding rule or redirect from your real email address (e.g.
support@mycompany.com) to the INO cx alias you copied. - Save the rule and send a test email to your real address to confirm it reaches INO CX.
Important: the redirect must remain active at all times. If it is removed or breaks, INO cx will stop receiving emails for that mailbox.
Tip: the exact steps to configure email forwarding vary depending on your provider. Refer to your provider’s documentation for detailed instructions (Google Workspace: Routing settings; Microsoft 365: Mail flow rules).
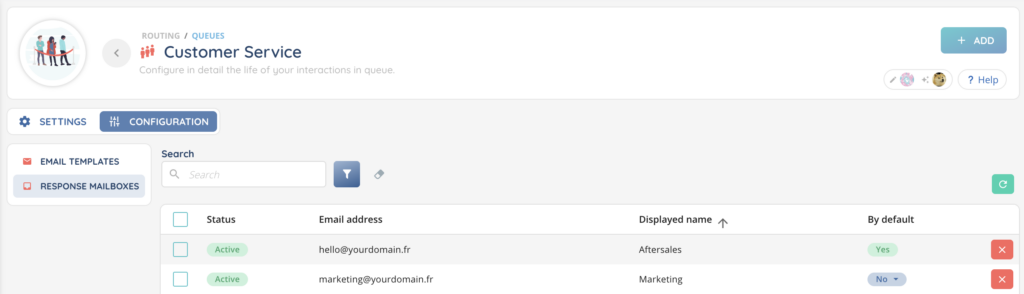
5. Linking a mailbox to a distribution queue
To have agents handle incoming emails, you need to link the mailbox to at least one distribution queue.
- Go to Maker > Queues
- Open the queue you want to associate with the mailbox
- In the queue’s mailbox configuration section, add the mailbox
- Save the queue
Keep in mind the following rules:
- A mailbox can be linked to multiple distribution queues.
- A distribution queue can have up to 20 mailboxes.
- Each queue must have exactly one default mailbox (see next section).
6. Setting the default mailbox on a queue
Each distribution queue has a default mailbox. This is the sender address used for outgoing emails sent from that queue. When you link the first mailbox to a queue, it is automatically set as the default.
- Open the distribution queue in Maker > Distribution queues
- In the mailbox section, identify the mailbox you want to set as default
- Click the option to set as default (or toggle the default indicator)
- Save the queue

You can change the default mailbox at any time. However, you cannot deactivate a mailbox that is currently set as the default on a queue — you must first assign a different default mailbox to that queue.
7. Managing mailboxes
7.1. Edit
From the mailboxes list, open the mailbox you want to edit. You can modify any of its configurable fields (display name, timezone, language, smart routing, etc.), then click Save. The alias does not change when you edit a mailbox.
7.2. Activate / Deactivate
You can deactivate a mailbox to temporarily stop it from receiving emails without deleting it. Deactivated mailboxes can be reactivated at any time.
Note: you cannot deactivate a mailbox that is currently set as the default mailbox on a distribution queue. To deactivate it, first assign a different default mailbox to every queue where it is used.
7.3. Delete
Deleting a mailbox permanently removes it from your organisation. Make sure the mailbox is no longer linked to any distribution queue and is not set as a default before deleting it. This action cannot be undone.
Once set up, your mailbox can be used as an entry point for email smart routings, as a sender in smart routing actions and workflow actions, in payment modules, in distribution queue settings, and when composing emails from the banner.