
[Reading time: 5 minutes]
This article explains how to connect a Monext account to INO cx, test it and collect payments with it. The general settings of banking contracts and payment modules are described in the Banking contracts and Payment modules articles.
Overview
Monext is a payment provider. Its integration into INO cx lets you collect card payments from your customers through a payment link sent by SMS or by email: the customer opens the link and pays on an INO cx page that shows the Monext payment form.
A Monext payment is always a single, immediate payment of the full amount of the invoice. Payment in installments, scheduled payments and fees are not available with Monext.
1. Linking a Monext account to a payment module in INO cx
Step 1: Get your Monext credentials
In your Monext administration center, find:
- your merchant ID;
- your access key;
- the reference of your point of sale.
Note: Monext has a test platform, called Homologation, with its own credentials. Keep both sets at hand: you will test with the Homologation credentials first (see section 2).
Step 2: Add a Monext banking contract
In the Maker:
- Go to the Payment module, then to Banking contracts, and click Create.
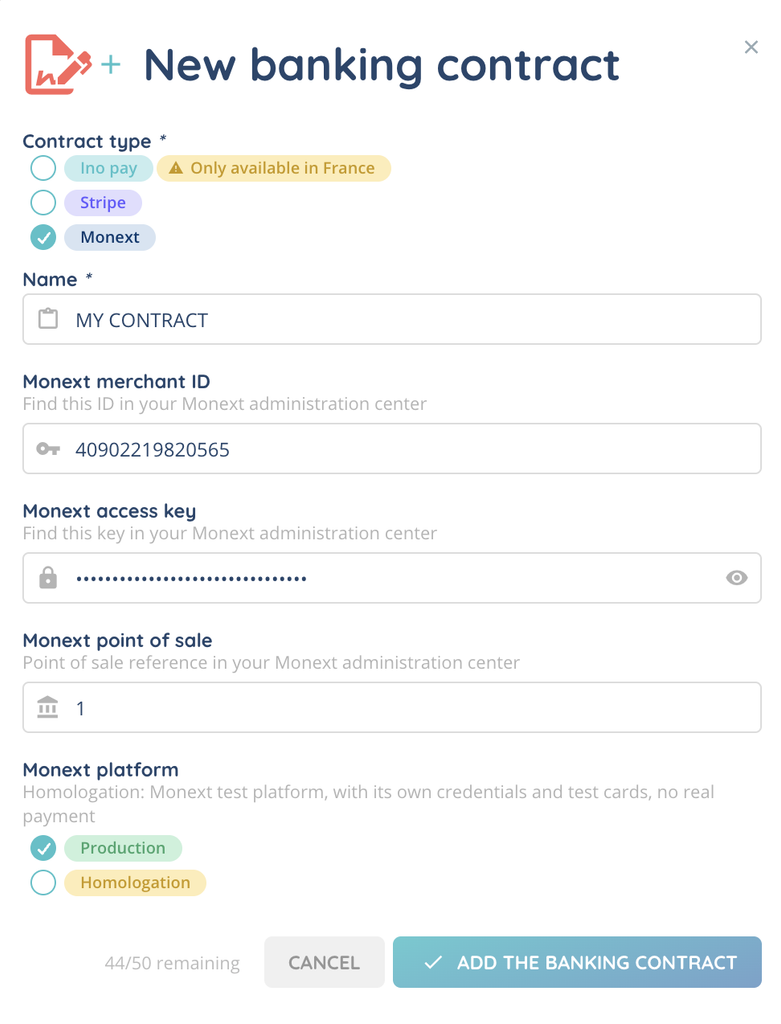
- In Contract type, select Monext and fill in the Name of the contract.
- Fill in the Monext fields, then click Add the banking contract.
| Field | Description |
|---|---|
| Monext merchant ID | Your merchant ID. Required. |
| Monext access key | Your access key. Required. |
| Monext point of sale | The reference of your point of sale. Required. It starts with a letter or a digit and contains only letters, digits, dots, hyphens and underscores (50 characters max). |
| Monext platform | Production (real payments, selected by default) or Homologation (the Monext test platform). |
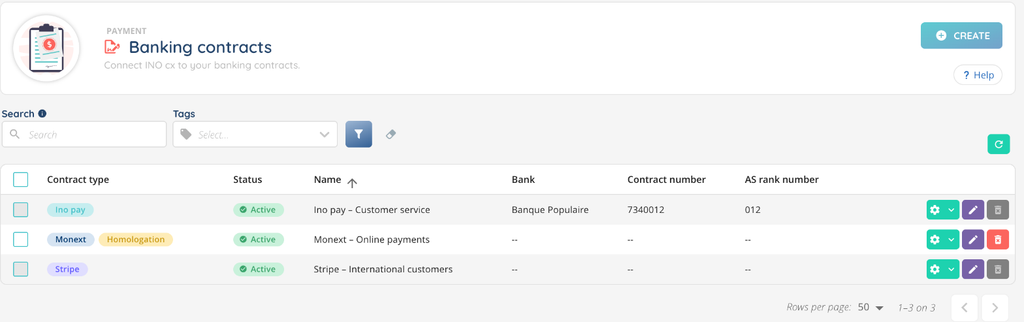
The contract appears in the list with the Monext tag, plus a Homologation tag when it uses the test platform. Its status is Active as soon as it is saved: INO cx does not check your credentials with Monext at this stage. A wrong credential only shows when a customer opens a payment link: the page displays “Payment failed”. Test your contract before going live (see section 2).
Note: the access key is never displayed again once saved. When you edit the contract, leave the field empty to keep the current key. If you change the Monext merchant ID or the Monext platform, you must type the access key again. When you duplicate a Monext contract, the access key is not copied: type it again in the copy.
Step 3: Create a Monext payment module
In the Maker, go to the Payment module, then to Payment modules, and create a payment module with your Monext banking contract. The banking contract of a payment module cannot be changed afterwards.
With a Monext contract, the payment module page is shorter:
- the Payment channel section only offers SMS and Email: enable at least one, with its payment request template;
- the Payment terms section is not displayed, since the payment is always instantaneous;
- the Security section, with the limit amount for a transaction, is not displayed.
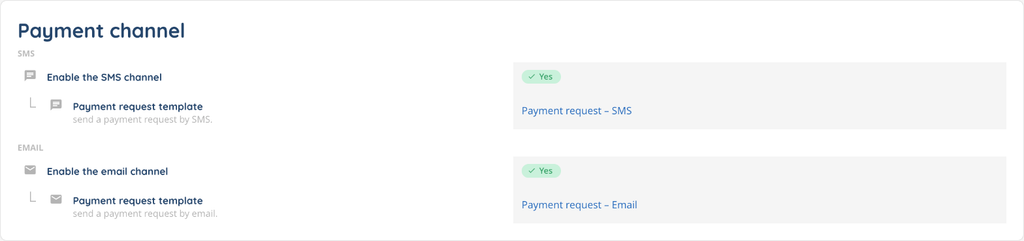
The new payment module is Off. You will switch it to On to test it on the Homologation platform (see section 2).
Step 4: Give advisors access to the payment module
In the profile of the advisors who will send the invoices:
- give access to invoices, with the right Can make link payments (sent by SMS or Email): without it, the payment link channels are not offered in the Banner;
- associate the Monext payment module with the profile.
For more details, see the Profiles article.
2. Testing on the Homologation platform
On the Homologation platform, payments use the test cards provided by Monext and no real money is debited. To test your configuration:
- On your Monext banking contract, select Homologation in Monext platform and fill in your Homologation credentials.
- Switch your payment module to On.
- Send a test invoice to yourself and pay it with a Monext test card.
- Once the test is conclusive, edit the banking contract: select Production and fill in your production merchant ID and access key.
Note: a payment made on the Homologation platform is handled like a real payment: the invoice switches to Paid, the transaction is recorded like any other (in the transaction log and in the Reporter), and the payment confirmations are sent. Use invoices created for the test.
Note: the Sandbox state of the payment module does not test Monext. In Sandbox, the customer sees the INO cx simulated payment page and INO cx never contacts Monext, so your Monext credentials are not checked.
3. Taking a Monext payment in the Banner
Advisors use the Monext payment module from the Invoices module of the Banner. When they prepare the payment of an invoice with a Monext payment module, the only payment mode is Instant payment, sent with Payment via email link or Payment via SMS link. Save the preparation is also offered, to pay later or with a tool other than INO cx. The invoice switches to Paid once the customer has paid.
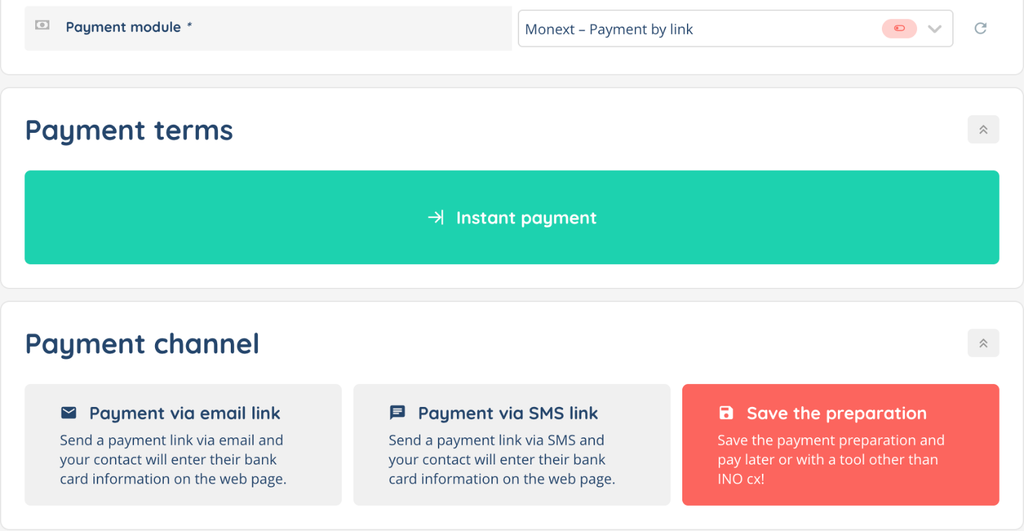
An invoice paid with Monext cannot be cancelled from INO cx: the Cancel action shows “The payment module is not of the INO type.” Refunds are made in your Monext administration center.
For more details on invoices, see the Invoices article.
4. What the customer sees
The customer opens the payment link received by SMS or by email. The payment page shows:
- the title Card payment, followed by the title set in the appearance of the payment module;
- the Total payment amount and the Invoice number;
- the Monext payment form, where the customer enters their card details.
The texts of the page are displayed in the language of the customer’s browser when it is English, French, Spanish or Portuguese, and in English for any other language.
Once the payment is made, the customer sees one of three messages:
| Message | Meaning |
|---|---|
| Payment successful | The payment is accepted and the invoice is paid. |
| Payment failed | The payment was refused or cancelled, or could not be made. |
| Your payment is being processed, you will receive a confirmation once it is validated. | Monext has not given its final answer yet, for example because the payment is under review. |
If payment confirmation templates are set in the Confirmations section of the payment module, the customer also receives a confirmation once the payment is accepted, including when Monext accepts it later: by SMS if the invoice has a mobile phone number, and by email if it has an email address.
4.1. Payments awaiting validation
Monext may put a payment on hold to review it before accepting or refusing it. In that case:
- INO cx checks the payment with Monext every 15 minutes, for up to 7 days, and marks the invoice as paid as soon as Monext accepts it.
- If the customer opens the payment link again in the meantime, they see the result page instead of a new payment form, so that the invoice is not paid twice.
- After 7 days without a final answer, INO cx stops checking: look up the payment in your Monext administration center.
Note: while a payment is awaiting validation, the banking contract cannot be deleted, and its contract type, Monext platform and Monext merchant ID cannot be changed. Wait for the payment to be accepted or refused. The name, the access key and the point of sale can still be changed.