
[Reading time: 8 minutes]
Overview
A Payment module is the configuration object that lets your platform collect payments from customers — through the advisor’s Banner, through an IVR, through an SMS or email link, or through a web widget integrated on your website. Each payment module is connected to a banking contract (which determines who actually processes the transactions: Ino pay or Stripe) and defines:
- Which channels customers can use to pay.
- Which payment terms are offered (instantaneous, scheduled or in installments).
- The confirmations sent after the payment.
- The appearance of the web payment form, when used.
You can configure several payment modules in parallel — typically one per business activity, brand or currency — and associate them with different advisor profiles.
1. Prerequisites and permissions
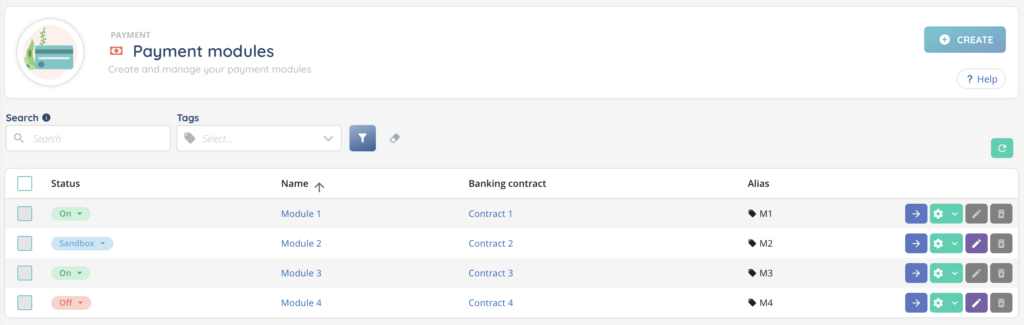
Payment modules are configured in the Maker, in the Payment module. From the left menu, open Payment > Payment modules. The module is part of the Smart licence.
Before creating a payment module:
- At least one banking contract must already exist in Payment > Banking contracts. The banking contract is what connects the platform to the actual payment processor — Ino pay (France only) or Stripe.
- If you plan to use the SMS or Email channel, the corresponding sender (SMS number, mailbox) and the request templates must be configured beforehand.
Two layers of permissions apply:
- Role (configuration): the right Payment modules (Read / Create / Modify / Delete) is needed to manage the modules from the Maker.
- Profile (usage): an advisor profile is associated with one or more payment modules to use them at runtime. The profile also carries the operational rights Can make banner payments by bank card, Can make banner payments by Smart Routing, Can make link payments (sent by SMS or Email) and Can cancel an invoice.
2. General settings
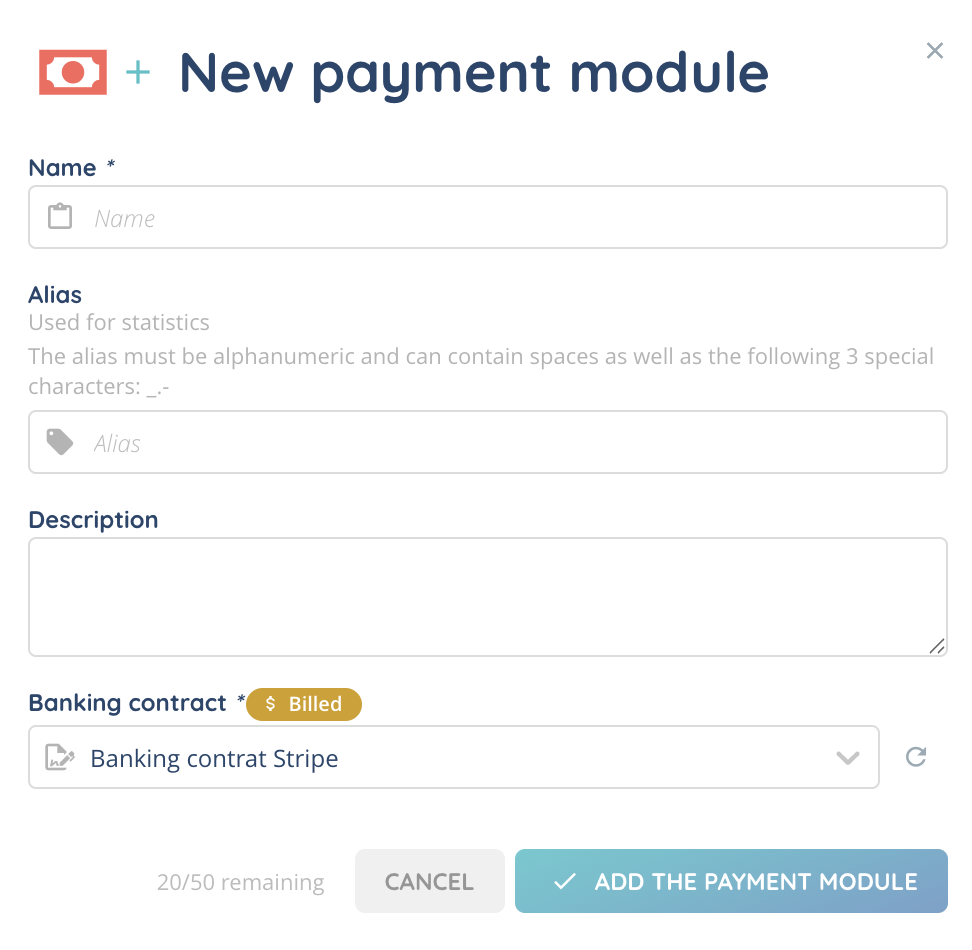
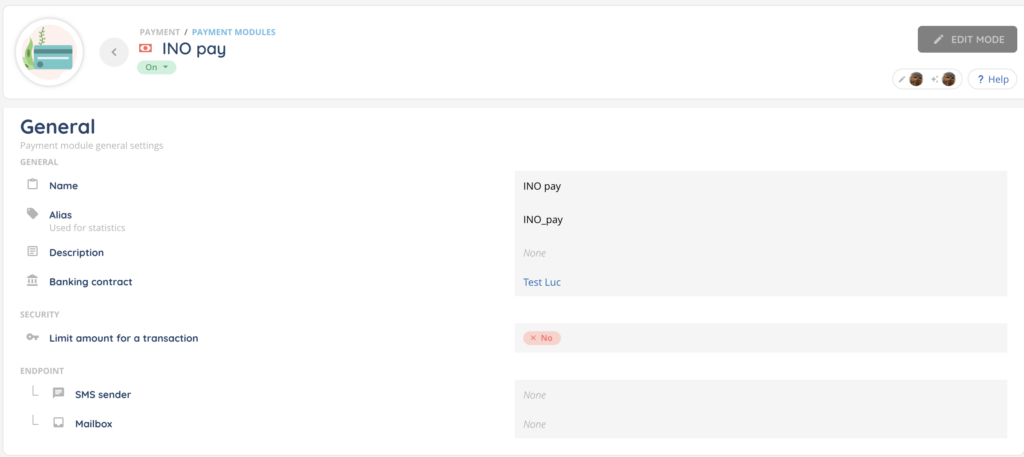
To create a new payment module, go to Maker > Payment > Payment modules and click the + button. The form is divided into several sections, starting with Payment module general settings:
| Field | Required | Description |
|---|---|---|
| Name | Yes | Display name of the module. |
| Alias | No | Short label for filtering and search. |
| Description | No | Free text description. |
| Banking contract | Yes | The contract used to process payments. The contract type (Ino pay / Stripe) determines which channels and options are available below. |
2.1. Security (Ino pay contracts only)
For Ino pay contracts, you can cap the amount of a single transaction:
- Limit amount for a transaction: toggle that enables the limit.
- Maximum amount: the cap, in euros (between 1 € and 1,000,000 €).
2.2. Endpoint
Two optional endpoint settings are used by the SMS, Email and reminder/confirmation features:
- SMS sender: the SMS number from which payment requests and confirmations are sent.
- Mailbox: the mailbox from which payment emails are sent.
3. Appearance
The Appearance section customises the look of the web payment template that is presented to the customer when they pay through the Web channel. The settings here are also used as defaults by the SMS and Email channels when they direct the customer to the web payment page.
- One or several Title entries, one per language (for example a French title, an English title, a Spanish title).
- A Color picker.
- A custom Favicon and a custom Logo — uploaded as images. Both can be reset to the platform default.
4. Payment form — additional fields
The Payment form section lets you add two optional fields that the advisor (or the customer on the Web channel) fills in when starting a payment, in addition to the always-required amount, phone number and email address:
| Field | Description |
|---|---|
| Invoice ID | An identifier of the invoice being paid. The format can be Text, String, Number or a Regex pattern. The field can be made required. |
| Customer number | An identifier of the customer. Same format choices and same required toggle as the Invoice ID. |
Leaving both fields off keeps the payment form minimal — only the amount, phone number and email are asked.
5. Confirmations
The Confirmations section configures the messages sent to the customer once a payment has been successfully made.
- Email: pick a Payment confirmation template to send a confirmation email.
- SMS: pick a Payment confirmation template to send a confirmation SMS.
You can enable either or both. Confirmations are sent from the SMS sender and mailbox configured in the Endpoint section.
6. Payment channels
The Payment channel section lets you enable up to five channels through which the customer can pay. Each channel has its own toggle and its own specific settings.
| Channel | Specific settings |
|---|---|
| BANNER – Enable the banner channel | Allows the advisor to take a payment directly from the Banner during an interaction. The Blur credit card information option blurs the card number on the advisor’s screen during input. Not available on Stripe contracts. |
| IVR – Enable the IVR channel | Allows the customer to enter their card number, expiry date and CVV directly on the phone keypad during a call. Requires three sound files: Sound file that requests entering the card number, The sound file that requests entering the card expiry date, Sound file that requests entering the card CVV. Not available on Stripe contracts. |
| SMS – Enable the SMS channel | The customer receives a payment link by SMS, sent from the SMS sender configured in the Endpoint section. Requires a Payment request template. |
| Email – Enable the email channel | The customer receives a payment link by email, sent from the mailbox configured in the Endpoint section. Requires a Payment request template. |
| Web | Embeds the payment form on your own website using the integration code (see section 6.1). A Return URL can be configured to redirect the customer after payment, whether successful or not. Not available on Stripe contracts. |
At least one of the Banner, IVR, SMS or Email channels must be enabled for the module to be usable.
6.1. Web channel — Integration guide
When the Web channel is enabled, an Integration guide button opens a panel with the HTML/JavaScript snippet to paste in your website. The snippet has two kinds of replacements:
- Required values:
- HTML container ID: the ID of the HTML element in which the payment form is inserted on your page.
- Variable containing the invoice ID: a dynamic value pointing to the invoice ID of the current customer.
- Optional values: title (FR / EN / ES), customised color, URLs of your favicon and logo. If left blank, the values set in the Appearance section are used.
Three optional callbacks can be wired to the embed code: onCancelCb() (Cancel button clicked), onSuccessCb() (payment button clicked) and onErrorCb(errorCode) (payment error). A Copy the code to the clipboard button lets you copy the snippet in one click.
7. Payment terms (Ino pay only)
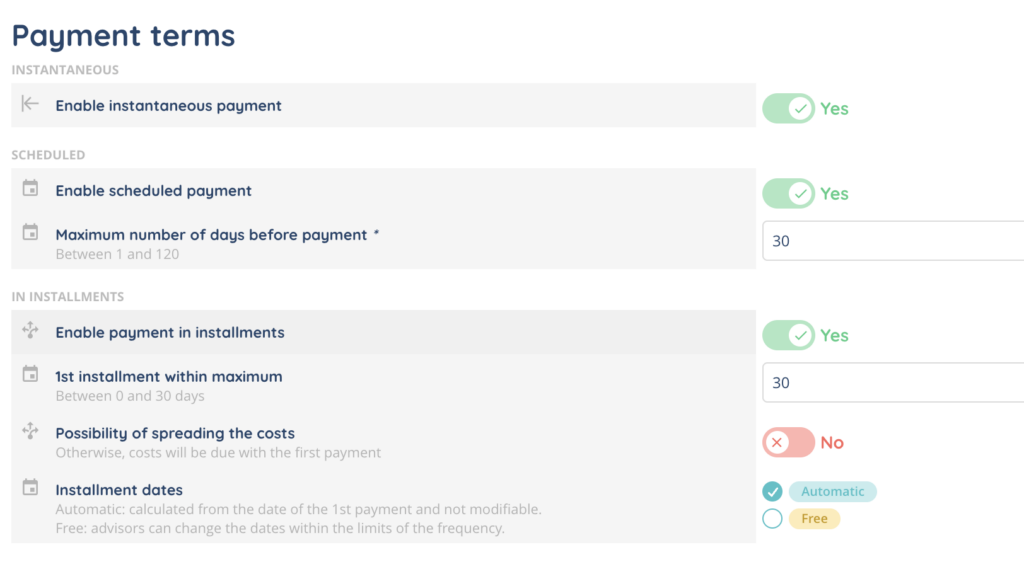
The Payment terms section defines how the customer can spread the payment. Three terms can be enabled independently (at least one must be enabled).
7.1. Instantaneous
Activated with Enable instantaneous payment. The customer pays the full amount immediately, in a single transaction. No additional setting.
7.2. Scheduled
Activated with Enable scheduled payment. The customer chooses a date in the future for the payment. One setting:
- Maximum number of days before payment: how far in the future the payment can be scheduled (between 1 and 120 days).
7.3. In installments
Activated with Enable payment in installments. The amount is split into several deadlines.
| Field | Description |
|---|---|
| 1st installment within maximum | Number of days within which the first installment must take place (between 0 and 30 days). |
| Possibility of spreading the costs | If enabled, the additional costs are spread across the installments. Otherwise, all costs are charged with the first payment. |
| Installment dates | Free: the advisor can change the dates within the limits of the frequency. Automatic: dates are calculated from the date of the 1st payment and cannot be modified. |
7.4. Offer(s) — for installments
When In installments is enabled, one or several offers describe the splitting options available to the customer. Each offer is a row in the offers table with:
- Due date: the number of installments (and time unit).
- Periodicity: weekly, monthly, quarterly, biannual or annual.
- Costs: the extra cost for choosing this offer.
- Cost type: a fixed amount in euros or a percentage.
At least one offer is required when In installments is enabled.
8. Testing cards
While the payment module is in sandbox mode, a Testing cards section lists card numbers you can use to simulate different payment results. Each card returns a specific outcome:
| Status | Outcome |
|---|---|
| Successful | The transaction succeeds. |
| Card issuer unknown | The issuer is not recognised. |
| Suspicion of fraud | The transaction is rejected for fraud suspicion. |
| Payment failed | A generic payment failure. |
Use these cards to validate your channel and template configuration before switching the module to production.
9. Edit, delete and activation
From the Payment modules list, each row provides an Edit action and a Delete action. Several modules can be deleted at once by selecting them in the list and using the bulk delete action.
A payment module can be in one of three states: Off, Sandbox or On. Once a module is activated (state On), most of its settings become read-only and the form displays the message “You can not modify this module because it is activated.” To edit an activated module, switch it back to Sandbox or Off first.