
[Reading time: 4 minutes]
Overview
A Banking contract connects INO cx to the payment processor that actually executes your transactions. Two processors are supported:
- Ino pay: (only available in France) the INO cx in-house payment service, attached to a bank with a VAD or VADS acceptance contract.
- Stripe: integration with a Stripe account, configured with the public and secret keys of the Stripe dashboard.
A banking contract is a prerequisite for any payment module: when you create a payment module, you pick which banking contract handles the actual transactions for it. You can configure several banking contracts in parallel — for example one Ino pay contract and one Stripe contract — and use them on different payment modules.
1. Access and permissions
Banking contracts are configured in the Maker, in the Payment module. From the left menu, open Payment > Banking contracts. The module is part of the Smart licence.
To access and configure banking contracts, the user’s role must include the appropriate rights on the Banking contracts entity:
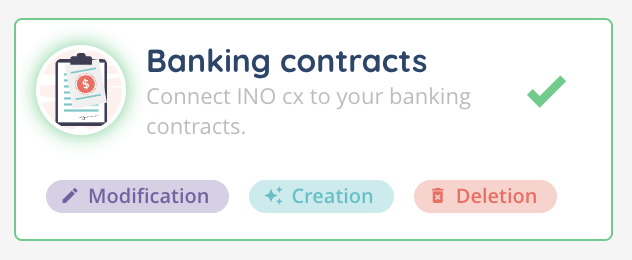
- Read – view the list and details of banking contracts.
- Create – create a new banking contract.
- Modify – edit an existing banking contract.
- Delete – delete a single banking contract or several at once.
These permissions are managed in the Roles module of the Maker.
2. The list view
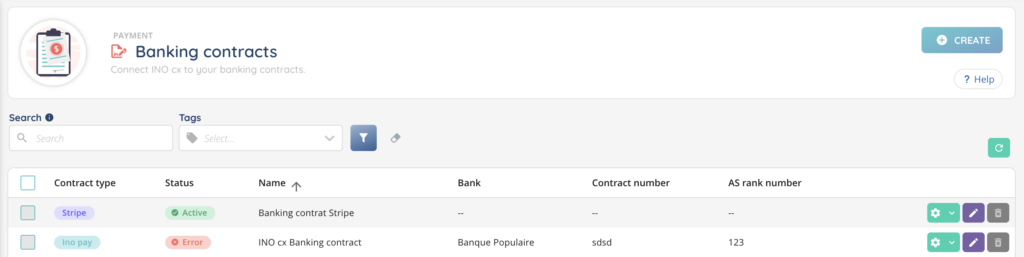
The Banking contracts list shows five columns:
| Column | Description |
|---|---|
| Contract type | The processor — Ino pay or Stripe, shown as a coloured tag. |
| Status | The current state of the contract: Active, Inactive or Error (see section 5). |
| Name | Display name of the contract. |
| Bank | For Ino pay contracts, the linked bank. Empty (--) for Stripe. |
| Contract number | For Ino pay contracts, the contract number provided by the bank. Empty for Stripe. |
| AS rank number | For Ino pay contracts, the 3-digit number of the acceptance system. Empty for Stripe. |
A search bar at the top lets you find a banking contract by its name.
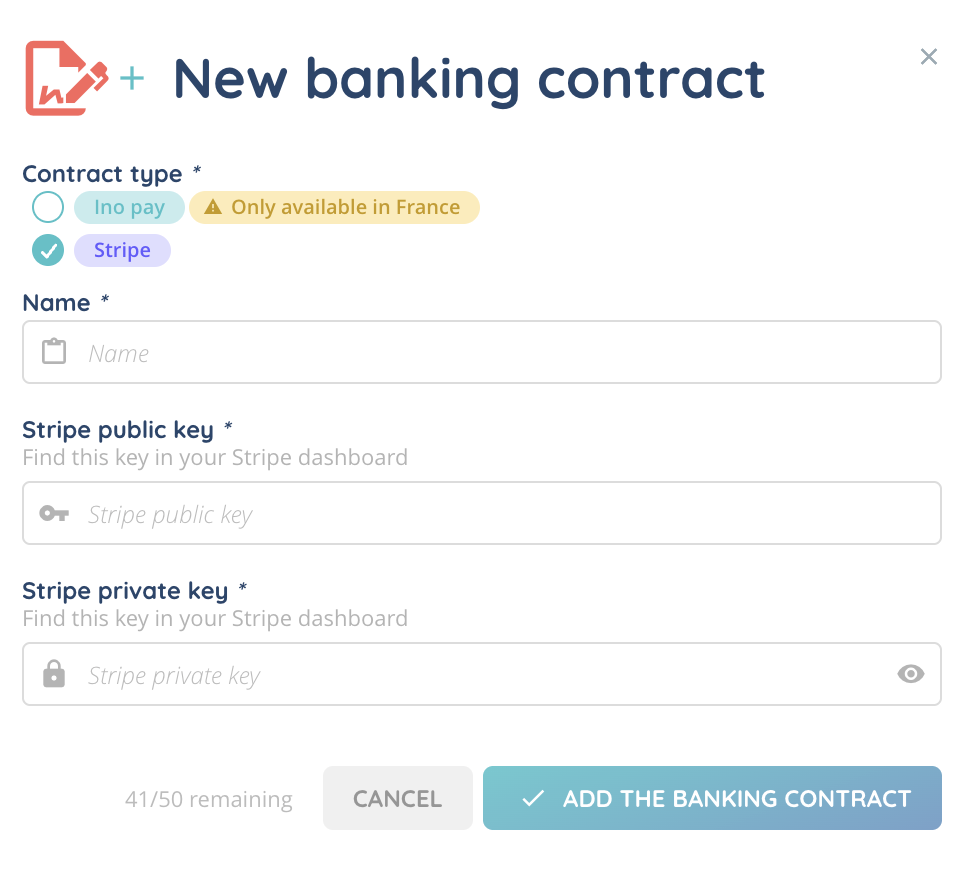
3. Create a banking contract
To create a new banking contract:
- Go to Maker > Payment > Banking contracts.
- Click the + button at the top right.
- Pick the Contract type — Ino pay or Stripe.
- Fill in the Name of the contract (display name only).
- Fill in the fields specific to the chosen type — see section 3.1 or 3.2 below.
- Click Save.
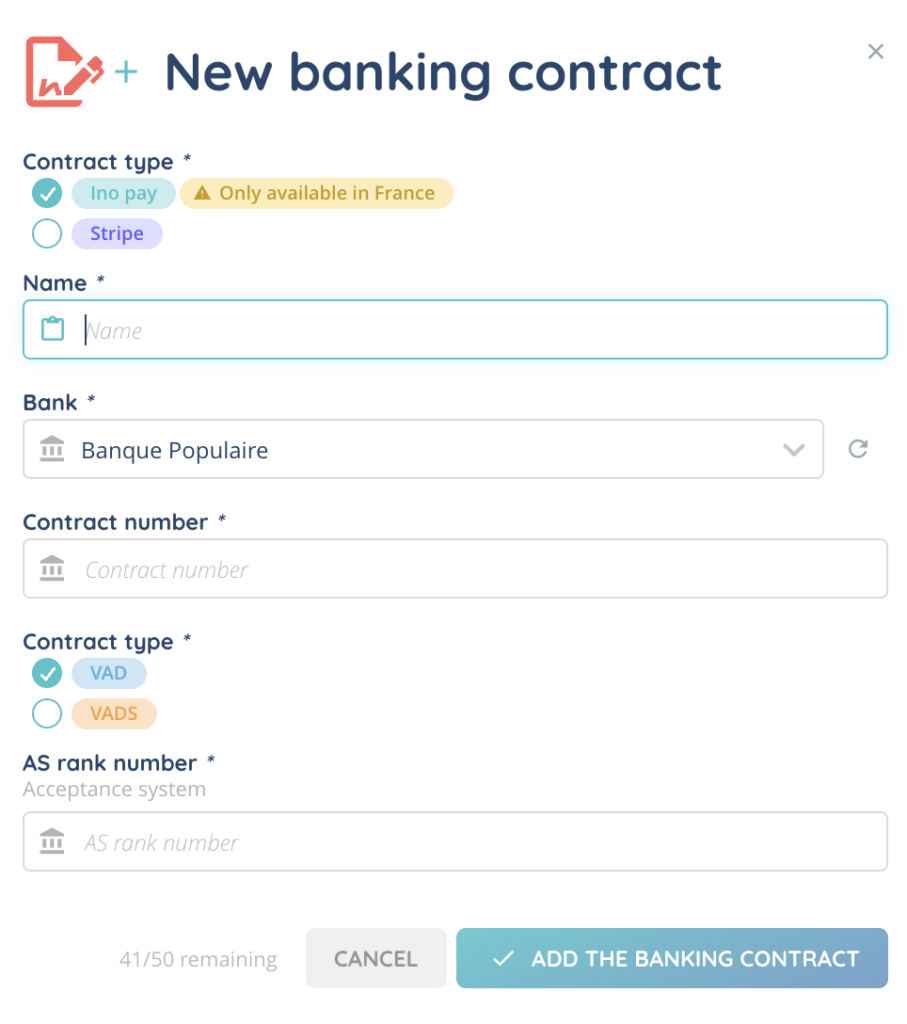
3.1. Ino pay contract
When the contract type is Ino pay, the following fields are displayed and required:
| Field | Required | Description |
|---|---|---|
| Bank | Yes | The bank associated with the contract. Pick it from the list of banks available on the platform. |
| Contract number | Yes | The contract number provided by the bank. Up to 255 characters. |
| Contract type | Yes | VAD or VADS — the acceptance contract type provided by the bank. |
| AS rank number | Yes | 3-digit number of the acceptance system (Système d’Acceptation). |
3.2. Stripe contract
For a complete walk-through of the Stripe integration — creating a Stripe account, retrieving the API keys from the Stripe dashboard, the Stripe-specific limitations inside INO cx — follow the dedicated Stripe article of the help center. The fields described below are what appears on the Banking contracts form once you have your keys ready.
When the contract type is Stripe, the following fields are displayed and required:
| Field | Required | Description |
|---|---|---|
| Stripe public key | Yes | The publishable key from your Stripe dashboard. Used by the client-side of the payment form. |
| Stripe private key | Yes | The secret key from your Stripe dashboard. Used by the server-side to authorise transactions. |
Saving a Stripe contract automatically sets up everything needed on your Stripe account to confirm the payments made through INO cx. Make sure the secret key is correct — an invalid key will prevent the contract from being saved.
Both keys are found in your Stripe dashboard. Treat the secret key as a password — do not share it.
4. Status of a contract
Once saved, a banking contract is automatically tested against the processor. Its Status column in the list reflects the result:
| Status | Meaning |
|---|---|
| Active | The contract is valid and ready to be used by a payment module. |
| Inactive | The contract is not yet ready. This usually means the bank has not confirmed it yet. To stop using a contract, detach it from its payment modules and delete it — there is no manual switch to deactivate it. |
| Error | The contract could not be validated by the processor. Check the keys, the contract number or the AS rank and save again. |
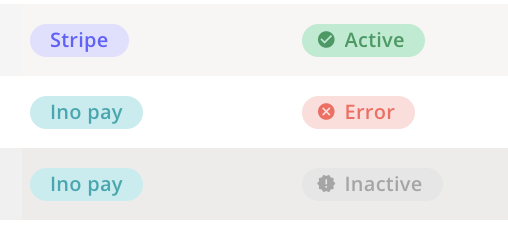
Only contracts in the Active state can be selected when creating or editing a payment module.
5. Edit, duplicate or delete a banking contract
From the Banking contracts list, each row provides the following actions:
| Action | Description |
|---|---|
| Edit | Modify the Name, the Contract type and all the type-specific fields. |
| Duplicate | Create a copy of the contract. Useful when several contracts share most of their parameters. The duplicated contract keeps the original type and field values; update them as needed. |
| Delete | Remove the contract. Before deleting a contract that is still referenced by a payment module, detach it from the module first, otherwise the module will no longer be usable. |
Several contracts can be deleted at once by selecting them in the list and using the bulk delete action.
6. Next step
Once at least one banking contract is in the Active state, you can use it from a Payment module to define how, when and through which channels payments are taken. See the Payment modules – Set them up article of the help center.