

[Reading time: 3 minutes]
This article explains where to find the trace of the deletions made on your client account, how to read the table and how to filter it to find a specific item.
Overview
The Deletion history tab sits in the Maker, in the client account settings. Open your user capsule, click Client account settings, then Deletion history in the left-hand menu.
For an overview of the client account settings and all of its tabs, see the Client account settings article.
This tab keeps the trace of two things: the deletions made by your users, and those made automatically once a retention time is reached. For each row, you see when the deletion happened, who made it, what it concerned and how many items were removed. This tab is for consultation: you cannot change or delete a row.

Warning: deletion results are available on D+1. A deletion made today does not show straight away, it becomes visible the next day.
1. Prerequisites
- The read right on Deletion history must be enabled on your role. Without it, the tab does not appear in the left-hand menu.
2. Open the Deletion history tab
- In the Maker, open your user capsule and click Client account settings.
- In the left-hand menu, click Deletion history.
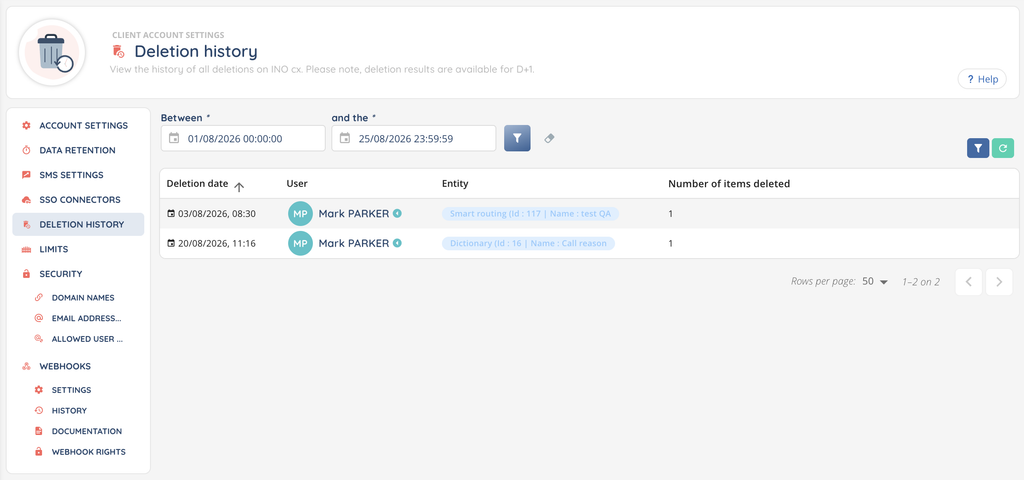
3. Choose the period
The period is required: the table shows nothing without it. The Between field is prefilled with the current day. Widen it to go further back.
4. Read the table
The table has four columns:
- Deletion date: the date and time of the deletion. The table is sorted on this column.
- User: who deleted. A user name, or “System” for an automatic deletion.
- Entity: what the deletion concerned.
- Number of items deleted: how many items were removed.
4.1. A deletion made by a user
The User column shows their name, and the Entity column completes the label with the identifier and the name of the deleted item, as (Id : 1234 | Name : My queue). The Number of items deleted column shows 1: one row is one item.
4.2. An automatic deletion
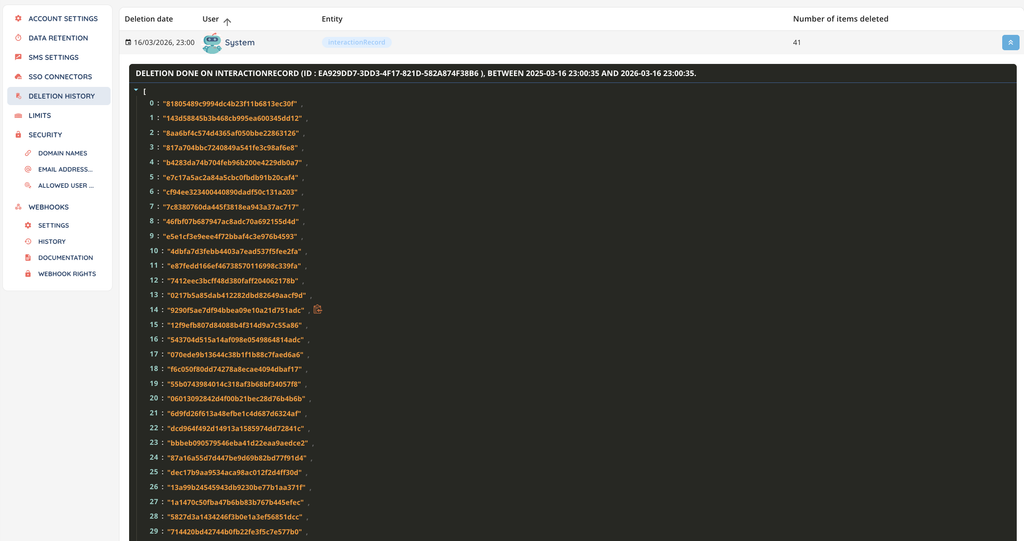
The User column shows “System”. A single row can cover many files: the Number of items deleted column tells you how many.
On those rows, a See details button appears. It expands the row and shows the period covered, as “Deletion done on …, between … and …”, along with the list of the items removed. That button does not exist for deletions made by a user.
Those automatic deletions come from the retention times set on the client account, on a queue, a voice campaign, a voice mailbox or an IVR recorder. That subject is covered in the Data retention article.
5. Narrow the search
5.1. Advisor
Select one or several users to keep only their deletions. You can pick 15 at most: beyond that, the message “15 users max.” appears.
5.2. Entity
Select one or several types of item to keep only the deletions that concern them. Here too, 15 at most: beyond that, the message “15 entities max.” appears.
5.3. Identifier
Enter the identifier of an item to go straight to its deletion. The value must be a whole number, 1 at the lowest. Below that, the message “The identifier must be greater than 1.” appears.
Note: the Advisor and Identifier filters only return the deletions made by a user. An automatic deletion is not tied to any user and does not carry the identifier of a single item, so it is left out as soon as you fill in either of those two filters.