
[Reading time: 6 minutes]
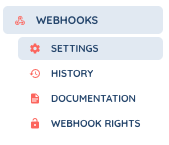
This article covers the four sub-tabs of the Webhooks part of the client account settings: Settings, History, Documentation and Webhook rights.
Overview
The Webhooks tab sits in the Maker, in the client account settings. Open your user capsule, click Client account settings, then Webhooks in the left-hand menu.
For an overview of the client account settings and all of its tabs, see the Client account settings article.
A webhook notifies your own system as soon as an event happens on the platform: a call starting, a case created, a campaign launched. INO cx calls the address you give it and passes the event on, which lets you connect your business tools to the platform without having to query INO cx in a loop.

The setup order is as follows:
- In Settings, enable the integration and enter your address.
- In Webhook rights, choose the events you want to receive. As long as none is enabled, nothing goes out.
- In History, check that your events are arriving.
- Documentation gives you the detail of the data sent, event by event.
Warning: the address you enter must start with https://. An http:// address is refused.
1. Prerequisites
- A Smart licence.
- The read right on Webhooks must be enabled on your role to see the tab, and the edit right to change the settings and the webhook rights.
- The execute right on Webhooks is required to retry a webhook from the history. It is a separate right from edit.
- An
https://address, on your system, ready to receive the events.
2. Open the Webhooks tab
- In the Maker, open your user capsule and click Client account settings.
- In the left-hand menu, click Webhooks, then pick the sub-tab you need.
3. Settings
Click Edit mode at the top of the page to make the fields editable.
3.1. Webhook integration
The Webhook integration field is set to Enabled or Disabled. As long as it is on Disabled, every other field stays out of reach and no event goes out.
3.2. URL
Enter the address where you want to receive the events. It must start with https://, otherwise the message “The URL is invalid.” appears. It becomes required as soon as the integration is enabled: left empty, you get “The URL is required.”.
3.3. Authentication
The Authentication field is set to Yes or No. On Yes, two fields appear:
- Login: between 1 and 255 characters.
- Password: between 1 and 45 characters. An icon lets you reveal what you type so you can check it.
Important: the password is never shown back to you. In display mode you always see six dots, even when no password is stored, and in edit mode the field is empty. Since it is required as soon as authentication is on Yes, you have to enter it again on every save, even when you are only changing the URL.
3.4. Save then test
Click Save. The message “The webhook information has been successfully modified.” confirms the change.
The Test the connection button then appears, under two conditions: the integration must be Enabled and you must have left edit mode. It checks the values already saved, not what you have just typed: so save first, then run the test.
- “Authentication successful.”: your system answered and accepted the credentials.
- “Authentication failed.”: it did not answer, refused the credentials, or the address is not filled in.
4. History
4.1. Choose the period and search
The table opens on the current day. Widen the period to go further back. The search field covers the address called and the name of the event.
Warning: the history is kept for 10 days. An automatic process runs every night and removes older entries. Do not rely on this tab for tracking beyond that.
4.2. Read the table
| Column | Content |
|---|---|
| Date | When the event was sent. |
| Webhook trigger | The name of the event, for example interaction:start. |
| URL | The address called at that moment. |
| Authentication | Yes or No, depending on whether the call carried credentials. |
| HTTP response code | Your system’s answer, with a colour cue: green below 300, orange from 300 to 499, red above. Empty if your system did not answer. |
INO cx waits 2 seconds for your system’s answer. Beyond that, the call counts as unanswered.
4.3. See what was sent
The See details button expands the line and shows the Query body, that is the data passed for that event. Handy to compare with what your system received.
4.4. See the attempts of one send
The Open button shows the list of attempts for that send, each with its Date and its HTTP response code. Only the 10 most recent attempts are kept.
4.5. Retry a webhook
The Retry button sends the same event to the same address again. The message “The webhook has been successfully relaunched.” confirms it went out, and a new attempt is added to the line.
- You need the execute right on Webhooks. Without it, the button does not appear.
- A 10 second delay applies between two attempts on the same line. Before the delay is over, the button does not respond and shows “Please wait 10 seconds before relaunching the webhook.”.
Note: there is no automatic retry. If your system was unavailable when the event was sent, the event is lost unless you relaunch it yourself from this tab. That is another reason the 10 day retention matters.
5. Documentation
This sub-tab is the technical reference to pass on to whoever will connect your system. It opens on Webhooks: Documentation and contains:
- A general presentation of what webhooks are on INO cx.
- Protocol: the reminder that the address must be exclusively in HTTPS.
- Enable the webhooks: the setup steps, the same as in this article.
- Authentication: how to enter the credentials, with the reminder that only the Basic method is available.
- To know, which contains the Structure shared by every event and an Example of NodeJS code to retrieve an event.
Every event shares the same structure: a unique identifier for the event, the name of the event, and a set containing its data.
Then comes one block per event, with its name, its description, the Event data table and an Example of what is sent. A navigation menu lets you jump straight to the event you care about.
6. Webhook rights
6.1. Choose the events
This is where you decide what you receive. Nothing goes out for an event left on No, even with the integration enabled and a valid address.
The events are split across twelve modules, shown as sub-tabs:
- Users, Payment, Interaction, Voice campaign, CRM, Entry points
- Document center, SMS campaign, Cases, Toolbox, WhatsApp campaign, Scheduled reports
Each module is split into sub-parts, and every event carries its own Yes or No switch. The Interaction module is the largest: it covers distribution, transfers, participants, recordings, SMART voice mailboxes, IVR recorders, SMS, Smart Routing and qualification, among others.
6.2. Save
Click Edit mode, set the switches you want, then Save. The message “The webhook rights have been successfully modified.” confirms the change. Cancel drops your changes.
Note: only enable the events you actually need. Each enabled event triggers a call to your system, and all those calls fill up the history.