
[Reading time: 8 minutes]
Overview
The Distribution groups tab, located in the Queues module of the Maker, lets you bundle several distribution queues together and split incoming flows across them according to a configurable load (%).

In practice, a distribution group is used to:
- Share the workload between several teams handling similar interactions (for example, two teams with different agents but processing the same type of customer requests).
- Apply a fixed weighting between queues (for example, 70% of interactions to queue A, 30% to queue B).
- Group several queues behind a single entry point that can be referenced from a Smart Routing — instead of duplicating routing branches.
Each queue inside a group is associated with a load between 0 and 100. The sum of all queue loads in a group must always be equal to 100.
Note: only incoming queues can be added to a distribution group. Outgoing queues are not eligible. The same queue can however be associated with several different distribution groups if needed.
When to use a distribution group
A common question is: I can already define a weight and a charge on a queue, so what does a distribution group add?
The answer is that the two settings act at different stages of the interaction lifecycle.
| Setting | Where it applies | What it controls |
|---|---|---|
| Weight and Charge on a queue | After the interaction has entered a queue | Priority of that queue against other queues handled by the same agent. It decides which queue the agent serves first when several queues are eligible. |
| Load (%) in a distribution group | Before the interaction enters a queue, at the routing stage | How incoming interactions are split across the queues of the group. It decides which queue the interaction lands in. |
Said differently:
- Without a group: 1 Smart Routing → 1 queue. The queue’s weight and charge govern how it competes for an agent’s attention.
- With a group: 1 Smart Routing → 1 group → split into N queues according to the group’s loads. Then each queue keeps applying its own weight and charge to compete for agents.
The two stages are independent and complementary: the group decides the dispatch ratio at the entry point, the queue’s own settings still drive the agent-side priority once an interaction has been placed in a queue.
Typical use cases for a distribution group:
- Load balancing between equivalent teams (same skills, same scope) without having to duplicate branches in the Smart Routing.
- Distribution between teams located on different sites or different time zones.
- A/B testing: send 50% of incoming interactions to a new queue (new agents, new training) to compare the results.
- Gradual ramp-up: send 10% of traffic to a new queue, then 30%, then 70%, by simply adjusting the loads of the group.
Prerequisites
To access and configure distribution groups, the user’s role must include the appropriate rights on the Distribution queues entity. The same set of rights covers both queues and distribution groups:
- Read – view the list and details of distribution groups
- Create – create a new distribution group
- Modify – edit a group, add or remove queues, change loads, reset the counter
- Delete – delete a single distribution group or several at once
These permissions are managed in the Roles module of the Maker.
The queues to be associated with the group must already exist. They are created in the Queues tab of the same module.
1. Create a distribution group
The Distribution groups list is accessed from the Maker, in the Queues module. At the top of the page, two horizontal tabs are displayed:
- Queues – the list of distribution queues
- Distribution groups – the list of distribution groups
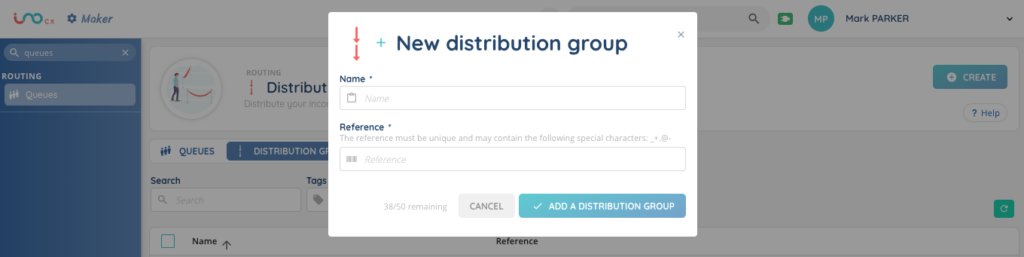
To create a new group:
- Open the Distribution groups tab.
- Click the + button at the top right of the page.
- Fill out the form:
| Field | Required | Description |
|---|---|---|
| Name | Yes | Display name of the group |
| Reference | Yes | Unique identifier code used to reference the group in your configurations and integrations |
- Click Save.
The new group appears in the list. At this stage, the group exists but does not yet contain any queue.
The list itself shows two columns – Name and Reference. A search bar at the top lets you find a group by its name.
2. Add queues to a group
Click the group’s name in the list to open its details page. The page lands directly on the Distribution queues tab, which lists every queue currently associated with the group.
To associate queues with the group:
- Click the + button at the top right.
- In the modal, select one or more queues from the list of available queues.
- Click Add.
The selected queues are added to the group with a default load of 0, except for the very first queue added to an empty group, which is automatically set to 100 so that the group is immediately valid (sum = 100). When you add more queues, you will need to redistribute the loads in edit mode (see section 3).
Note: the selection list only shows incoming queues that are not yet linked to this group. The same queue may be associated with several distribution groups in parallel, which is useful for example to dispatch the same queue from several Smart Routings with different load ratios.
3. Manage queue loads
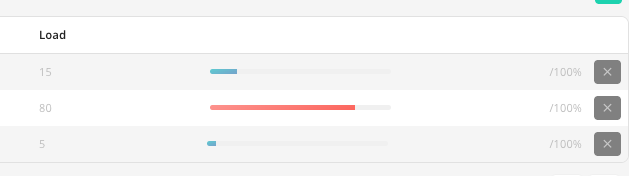
The Load column displays the percentage of interactions distributed to each queue. As soon as you have added more than one queue, you will need to redistribute the loads so that the sum stays equal to 100.
3.1. Enable edit mode
To edit the loads, click the Edit mode button at the top right of the table. The Load column then becomes editable for each queue.
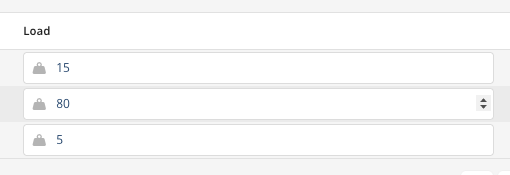
3.2. Set the loads
For each queue, enter a value between 0 and 100.
- The sum of all queue loads in the group must be equal to 100. If the total is not 100, the form displays an error and the changes cannot be saved.
- A load value must be between 0 and 100. Any value outside this range is rejected.
3.3. Save or cancel
- Click Save to apply the new loads.
- Click Cancel to discard the changes and exit edit mode.
Once saved, the Load column displays the new percentage as a progress bar.
4. How loads are applied and reset
The configured loads (%) are applied on average over time.
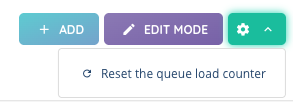
You may want to reset this mechanism — for example after changing the loads, after a long inactivity period, or to start a new measurement campaign on a clean state. To do so:
- From the group’s Distribution queues tab, click the settings dropdown at the top right.
- Select Reset the queue load counter.
- Confirm the action.
The reset only clears the internal distribution counter for all queues of the group at once — the configured loads (%) are not changed. The next interactions will be dispatched as if the group had just been created.
Once a queue has been chosen by the group’s algorithm, the interaction is placed in that queue and follows the queue’s own distribution rules (weight, charge mode, agent profiles, working hours, etc.). The group’s loads no longer apply at this stage.
5. Edit, duplicate or delete a group
From the Distribution groups list, each row provides the following actions:
| Action | Description |
|---|---|
| Edit | Modify the Name and Reference of the group. |
| Duplicate | Create a copy of the group, including its associated queues and their configured loads. The duplicated group keeps the same queues and load values; only the Name and Reference must be updated. |
| Delete | Remove the group. The associated queues are not deleted — they simply become available again for another group. |
Several groups can be deleted at once by selecting them in the list and using the bulk delete action.
To remove a queue from a group, click the delete icon on its row in the group’s Distribution queues tab. A queue can only be removed if its load is equal to 0. Set the load to 0 in edit mode and save before removing the queue, so that the loads of the remaining queues still sum to 100.
Setting a queue’s load to 0 without removing it is also a way to temporarily deactivate it: the queue stays linked to the group but no longer receives traffic from it, and its configuration is preserved if you decide to reactivate it later.
6. Use a distribution group in a Smart Routing
Once configured, a distribution group can be used as a destination in a Smart Routing for all three flow types — voice, email and messaging — to dispatch interactions across the queues of the group according to the configured loads.
In the Smart Routing editor:
- Add a Distribution to queue action in the routing tree.
- In the Distribution to field, select Distribution group (instead of Queue).
- Pick the distribution group from the list, or specify its reference.
From that point onwards, every interaction reaching this branch of the Smart Routing is dispatched into one of the group’s queues according to the configured loads.
See the Smart Routings articles of the help center for the full configuration of routing trees and distribution actions.