
[Reading time: 4 minutes]
Overview
Cases can be compared to a ticketing system for managing customers issues or questions.
The cases make it possible to categorize it, assign it to an agent, consult it and follow its evolution over time. It can possibly be linked to an interaction, and to a CRM card.
Configuring (Maker)
Before you can start using the cases, you need to create the settings in the Maker’s “CASES” module.
Note: Some origins, status and fields are created by default by INO, called “System”. If you create new ones, they will be marked “Customized”.

TYPES
Depending on your usage, it can be a department (marketing, sales, legal, etc.) or the category of your customer’s issue (delivery, connexion, paiement, etc.)
ORIGINS
The source of the case. Does it come from a call, an email?
REASONS
The reason of the contact. Why is the customer contacting us? (delay in delivery, internet box issue, refused payment, membership question, etc.)
STATUS
The progress of the case. Is the case to be processed, in process, closed?
CASE FIELDS
The content that will be filled in the case (e.g. phone number, e-mail address, comment, rating, date, etc.).
You’ll have to choose a type of field (phone number, note, numeric…) which can’t be modified once created. If you choose the “list” type, be aware that the list has to be already setted up.
The default value is an automatic filling of the field. It can be modified if the agent has the right of modification.
Regular expressions (RegEx) can be used to impose a format on your field. For example, if you want a telephone number to start only with 06, or an email to be in the form text@text.text, etc.
Make sure to choose if this field is required or not.
⚠️ If you choose the field to be “Required”, and that the agent only has view rights for this field in the layout, (and therefore cannot modify the field), it will be necessary to enter a default value.
CASE LAYOUTS
Layouts allows you to choose how the case fields will be arranged in the Banner. Two display modes are available: full page or widget. You could create one of each, for every profile you want to create. A layout can be used in several profiles.
- Full page: fields can be placed as a grid in 4 columns.
- Widget: fields are positionned in a sigle column, one below the other. It is a condensed mode, that can be used during an interaction.
Once the case layout is created (name and display mode chosen), you’ll have to open it and select the fields you want to associate to this particular layout.
For full page mode, you can add as many field as you want. Make sure you put the 4 most important fields first: these are the ones that will appear at first glance in the cases list.
For widget mode, we recommend that you select only the main fields. Please note that you can always open the full page view from the widget view.
Note: you can choose for each case field you add, if the agent can Read & Modify or just Read.

Giving access (Maker)
Once your cases are set up, the appropriate rights must also be set up in the profile.
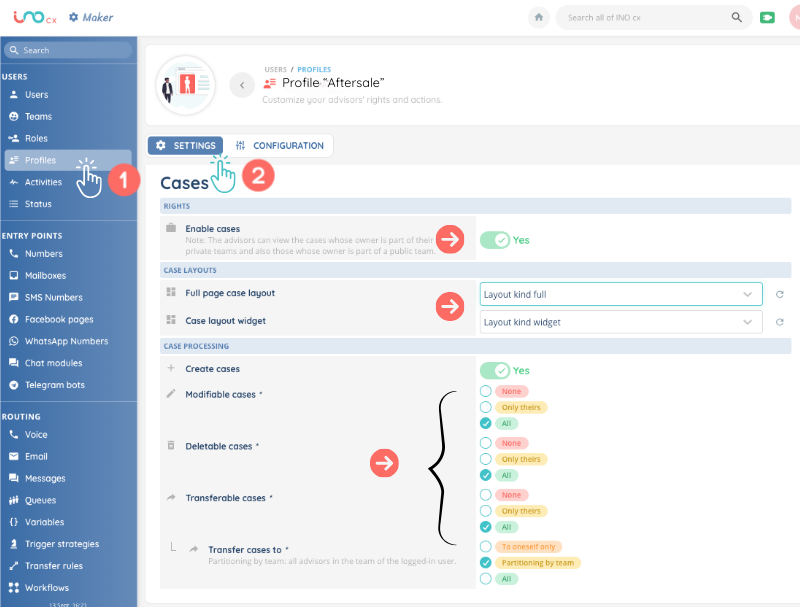
- Enable cases: can the agent access cases at all?
- Cases layouts: which layout will be displayed for this profile, in full page mode and in widget mode ?
- Create, edit, delete, transfer cases: what are the rights associated with this profile ?
It is possible to choose between “None”, “Only theirs” (= the one the agent created) and “All”. These rights should be granted with care.
The team partitioning means that the case will only be transferable to members of the user’s team(s) (wether they are public or private).
Now, you can use them in the Banner !