
[Reading time: 8 minutes]
Overview
The CRM v2 module in INO cx allows you to centralize and display customer data directly in the agent interface. It can be connected to a third-party CRM (Salesforce, Zendesk, etc.) or used as a local INO cx CRM.

With this integration, agents can view, create, and edit customer CRM cards in INO cx, and changes are automatically made in the third-party CRM.
The CRM v2 module allows you to group CRM objects into a single CRM and provides advanced customization options such as :
- assign interactions to a defined object
- prioritize searching amongst the objects during screen-pop
Prerequisites
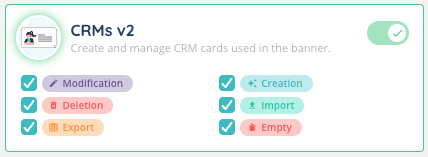
To access and configure the CRM v2 module, your role in the Maker must have the appropriate permissions. Available permissions are:
- Access: access the CRM v2 module.
- Modify: edit CRM configuration and data.
- Create: add new CRM cards.
- Delete: remove a CRM card.
- Import: import data into the CRM.
- Export: export CRM data.
- Empty: empty a CRM object (only available for INO cx CRM objects, not external integrations).
An authentication method is required to connect to an external CRM. The same method can be reused for multiple CRM v2 instances.
To link CRM objects to users and define their display, you must also have access to the Profiles configuration in the Maker.
1. Accessing the CRM v2 Module
- Log in to the Maker with a role that has the required permissions.
- In the side menu, click CRM v2.
- The page displays the list of existing CRM v2 configurations.
- Click Create CRM to add a new one, or select an existing CRM to edit it.
Note: In the list, a search bar allows you to search by name or reference. A second search bar allows you to search by tag.
A cogwheel button at the top allows you to download a CSV template or perform an import.
For each item in the list, you will see the usual buttons (arrow to open, cogwheel to duplicate, view history, view dependencies, manage tags, pencil to edit, and dustbin to delete).
2. Creating a CRM
When creating a new CRM v2, you will need to provide the following information:
- Name
Choose a clear, descriptive name that will be easily identifiable in the list (e.g., “Salesforce CRM – Customer Service”). - Reference
- Description (optional)
- Type: INO cx or Integration
- Integration type (if you choose integration before): Hubspot, Salesforce , Zendesk sell, Zendesk support, Zoho CRM, Zoho desk
- Authentication method (only for integration type CRM)
Select an existing method for the integration type you choose. This method allows INO cx to communicate with your external CRM.
Once your CRM v2 has been created, open it and you will see three tabs:
- Settings: to modify the previous elements (the type and integration type cannot be modified).
- CRM objects: add up to 10 objects.
- Card screen-pop scenarios
3. Configuring CRM Objects
3.1. New CRM object
When you create a new CRM object, you will need to select:
- a type (INO cx or Integration): Note: INO cx objects added in an integration-type CRM will not be synchronized with your external CRM. They will be stored on INO cx.
- the integrated object (for integration objects only): Integrated object is fixed and determined by the selected connector (e.g.,
Account,Contact,Casefor Salesforce,Ticketfor Zendesk support). - the object type: for statistics
- the name
- the API name
3.2. Configuring this CRM object
For each object you add to CRM v2, you open and can configure:
- CRM fields: Add all the CRM fields you want for this CRM object. Fill in:
- the integrated field
- the name
- the API name is filled in automatically
- the type
- the default value
- the regular expression
- a switch if the field is required or not
Note: A search bar allows you to search within these fields. Each field can be modified, deleted, duplicated, viewed in history, or viewed for dependencies.
If the object is INO cx type, a button allows you to empty the fields inside the object.
A cogwheel button at the top allows you to export these fields.
- Card layouts: Create multiple full-page layouts and widget modes to choose which fields will be displayed on INO cx for each layout and in what order. You can then assign different layouts according to profiles.
For each field in this layout, choose whether the user will have Read + Write or Read only permission.
4. Screen Pop Scenarios
Screen pop scenarios automatically open a CRM card when an interaction is received or initiated.
Only the conditions defined in the scenario determine if the CRM card will open.
Once you created your screen-pop scenarios, you can open it and configure 2 tabs: card search and assign interaction.
4.1. Card search
The Card Search tab allows you to define the sequence of searches that will be performed in your CRM objects when a card screen-pop scenario is triggered. Searches are executed in the exact order in which they are listed: the system will start with the first search, and if no matching CRM card is found, it will proceed to the next one, and so on.
For each search step, you can configure the following:
- CRM object – Select the object type in which the search will be performed. The list of available objects depends on your CRM connector.
- Create a new card if not found – Enable or disable automatic CRM card creation if the search does not return any result.
- Yes: A new CRM card will be created in the selected CRM object. Note: You cannot select “Yes” for integrated CRMs.
- No: No CRM card will be created; the system will move on to the next search step (if any).
- Select a conforming CRM card – Define whether all the specified conditions must be met, or if meeting at least one condition is enough for the CRM card to be considered a match.
- Conditions – Add one or more conditions to refine the search. Each condition is defined by:
- CRM field – The field in the CRM object that will be checked (e.g., Mobile phone, Email).
- Value – The value to match against. You can use magic fields (blue wand) to dynamically insert variables from the interaction context (for example,
{{interaction.endCustomer.endpoint}}for the customer’s phone number).
You can add multiple search steps to create a precise and efficient search chain. For example, you might first search for a Contact by mobile number, and if no match is found, search for an Account by company name.
4.2. Assign interaction
The Assign Interaction sub-tab allows you to configure how an interaction can be assigned to other CRM objects during a screen-pop scenario. This option is used in Card screen-pop scenarios to define which CRM object will be linked to the interaction and under which conditions.
It is only for integrated CRMs and is mainly used to log interactions on these CRMs.
Example: for Salesforce, we want to assign the interaction to the Task object, which allows activities to be logged. These activities can be linked to a card of a CRM object (Contact, Account, Case, Lead, etc.).
Enable or disable the feature
At the top of the page, toggle assign interaction to Yes to allow interactions to be assigned to other CRM objects. If disabled, no assignment will occur.
Configuration steps
- CRM Object
- Select the CRM object you want to link the interaction to.
- The list of available objects depends on the connected CRM (e.g., Salesforce, Zendesk).
- Fields and values
- Specify one or more CRM fields and their corresponding values to filter the CRM cards.
- You can use magic fields to insert dynamic data from the interaction (for example, caller number, ticket ID).
- Conditions
- Define the conditions under which the interaction will be assigned to the selected CRM object.
- Choose between:
- All the following assertions – all conditions must be met.
- At least one of the following assertions – only one condition needs to be met.
- For each condition, select the field, operator, and value.
- Add or remove rules
- Click the + button to add more fields or conditions.
- Click the trash bin icon to delete a rule.
Once all the required fields, values, and conditions are set, click Save to apply your configuration.
5. Managing CRM v2 in Profiles
To configure access to a CRM v2 within a user profile:
- Open the Profiles module in the Maker.
- Open the desired profile, then the Configuration tab.
- Click on the CRMs v2 sub-tab.
- Click + Add and select the CRMs v2 to associate.
- Define the permissions to grant for this CRM:
- Edit
- Create
- Delete
- For each CRM object (e.g., Case, Contact, etc.), choose:
- Full page layout (full view)
- Widget layout (compact view in the banner)
- Click Add CRM.
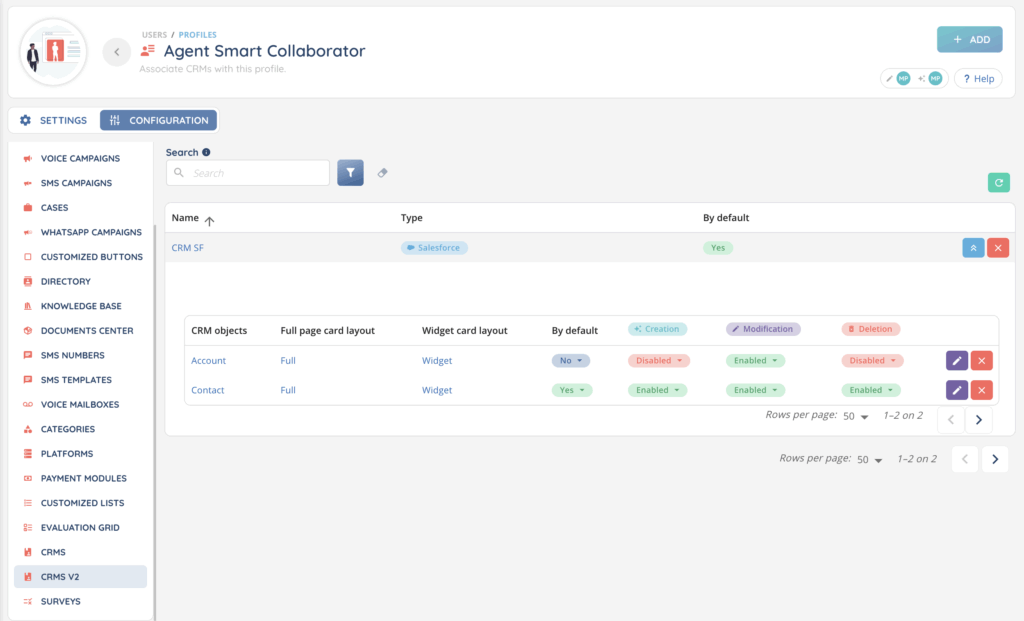
Once the CRM v2 is added to the profile, you can:
- Expand the CRM entry to manage object-level permissions individually.
- Set a default object: it will be displayed first in the banner when using the CRM.
Now, you can use CRM v2 in the Banner!