

[Reading time: 5 minutes]
Overview
Single Sign-On (SSO) is a mechanism that allows a user to log in once and access multiple applications without having to re-enter their credentials each time.
Example: If you log in once with your Google account, you can access Gmail, YouTube, and Google Drive without logging in again.
Benefits:
- No need to remember multiple passwords
- Saves time
- Reduces the risk of password theft
Configuring SSO on INO cx
Prerequisites
- The username must be in email format and match the one defined in your SSO Provider (Google, Azure, Okta, etc.).
- Your role must include read access to SSO connectors. Creating a connector also requires the create permission.
Step 1: Creating an SSO connector
- In the Maker, open the Data module, then select the SSO connectors tab.
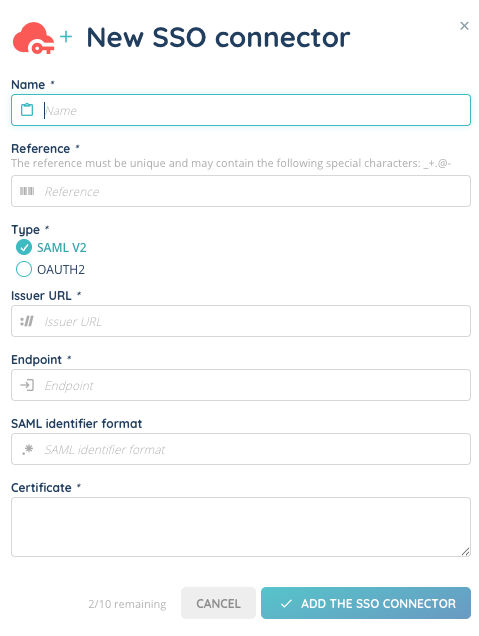
- Create an SSO plugin by filling in the following parameters:
- Name: Give a name to your connector.
- Reference: A unique identifier for the connector. Allowed special characters are _ . + – @
- Type:
- SAML v2 is a standard authentication protocol that allows exchanging information between an identity provider (IdP) and an application.
- OAUTH 2 is an authorization framework that allows applications to obtain limited access to user accounts on an HTTP service, without sharing the user’s credentials. Instead, the application receives an access token from the identity provider.
- Note: SAML v2 is an authentication protocol mainly used in enterprise environments. It allows your advisors to log in to INO cx using their corporate identity (e.g. via Azure AD, Okta, Google Workspace) without creating a separate password. OAuth2 is an authorization framework. It is typically used when INO cx needs to connect to external applications (e.g. Salesforce, Hubspot, Zoho CRM) and access data on behalf of the user, using an access token instead of a password.
- FOR SAML v2:
- Issuer URL: The identity provider (IdP) URL, identifying the entity sending SSO requests.
- Example:
https://accounts.google.com/o/saml2?idpid=XXXXXXXXX
- Example:
- Endpoint: The URL to which INO cx sends SSO requests to authenticate users.
- Example:
https://accounts.google.com/o/saml2/idp?idpid=XXXXXXXXX
- Example:
- SAML Identifier Format: A unique identifier sent to the IdP to validate the user.
- Certificate: A security certificate provided by the IdP to ensure secure communication.
- Expected format: A text starting with
-----BEGIN CERTIFICATE-----and ending with-----END CERTIFICATE-----.
- Expected format: A text starting with
- Certificate: A security certificate provided by the IdP to ensure secure communication.
- Identity (EntityID): https://{{domain}}.ino.cx/api/saml/metadata
- Reply URL (ACS): https://{{domain}}.ino.cx/api/sso/login/callback
- Issuer URL: The identity provider (IdP) URL, identifying the entity sending SSO requests.
- FOR OAUTH 2:
- An authentication method must be chosen (e.g. Hubspot, Salesforce, Zoho CRM, Zendesk Support, etc.).
- Each connector will redirect to the external tool for authentication.
Mandatory fields are marked with an asterisk (*). All these parameters are provided by your Identity Provider (IdP). If you don’t know where to find them, check your IdP’s documentation or ask your IT team.
Tip: test your SAML v2 connector without an identity provider
To validate a connector before connecting your real IdP, you can use Mock SAML, a free test identity provider.
- Issuer URL:
https://saml.example.com/entityid - Endpoint:
https://mocksaml.com/api/saml/sso - Certificate: open
https://mocksaml.com/api/saml/metadata, copy the value inside the<X509Certificate>tag and paste it between-----BEGIN CERTIFICATE-----and-----END CERTIFICATE-----
Then create a test advisor whose username is the email address you will use on the Mock SAML login screen. Mock SAML only accepts addresses on the example.com and example.org domains, and any password works. Associate this advisor with the connector (step 2), then open the login URL (step 3).
⚠️ Important: Mock SAML lets anyone authenticate with any address on those domains, without a real password. Use it on a test environment only, and delete the test connector and the test advisor as soon as your check is done.
Step 2: Linking a user to an SSO connector
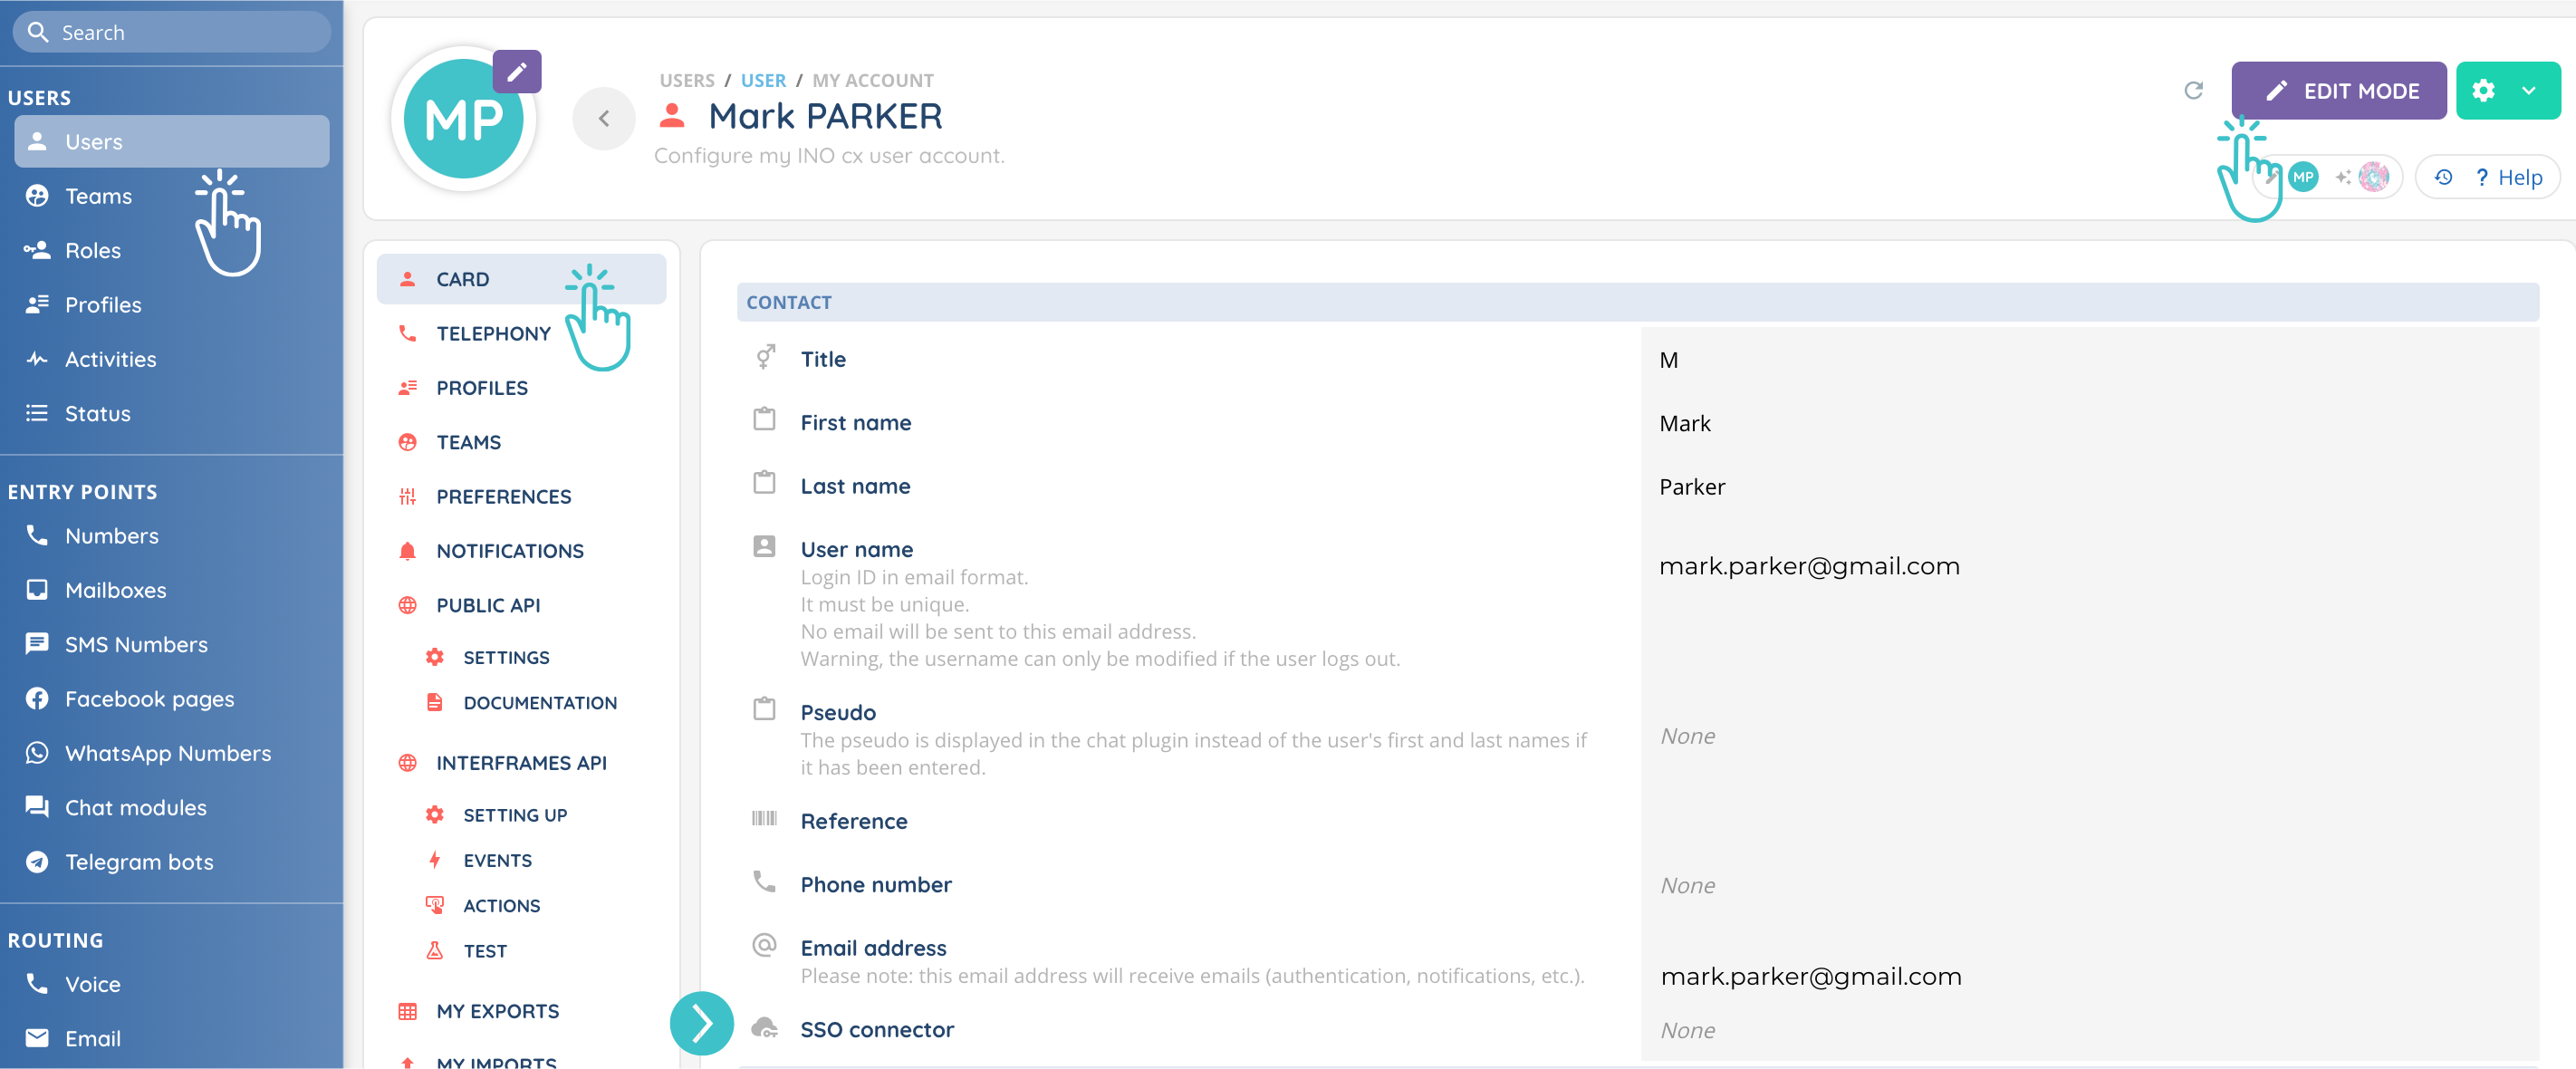
- In the Maker, go to the User module.
- Open the User card.
- In SSO connectors, associate the user’s account with one or more SSO connectors.
Note: When you associate the SSO connectors at the moment you create the user, the advisor automatically receives a welcome email listing the login link for each connector. They do not receive the usual email inviting them to set a password.
This email is only sent at user creation. If you associate a connector with an advisor who already exists, no email is sent: share the URL manually (see step 3).
Step 3: Generating the login URL
- Return to SSO connectors list.
- Click the cogged wheel next to the connector.
- Click “Copy the login address used on INO cx”.
- A new login URL is generated. Share this URL with users so they can log in via SSO.

For SAML v2 connectors, the same menu also offers “Copy the entity ID” and “Copy the ACS URL”. These two actions copy the values your identity provider needs, already built with your own domain.
Step 4: Managing SSO connectors
From the SSO connectors module, you can view and manage all existing connectors.
The list displays:
- Name
- Reference
- Type (SAML V2 / OAUTH2)
- Authentication method (for OAUTH2)
- Issuer URL (for SAML V2)
- Endpoint (for SAML V2)
- SAML identifier format (for SAML V2)
Identifier and Reply URL
Note: You do not need to build these two URLs yourself: copy them from the connector’s options menu in the SSO connectors list (see step 3).
Identifier (or Entity ID): What is the application?
The Identifier is a unique identity used to identify your application to the IdP. It ensures that the IdP is exchanging information with the correct application.
- Example:
https://yourclientdomain.com/api/saml/metadata(replace with your own domain).
Reply URL (or ACS URL, Assertion Consumer Service): Where to redirect the user after login?
The Reply URL is the address where the IdP redirects the user after a successful authentication. This is where the application retrieves and validates authentication information.
- Example:
https://yourclientdomain.com/api/sso/login/callback(replace with your own domain).
These two elements are essential for setting up a secure SSO with an Identity Provider!