
[Reading time: 7 minutes]
Overview
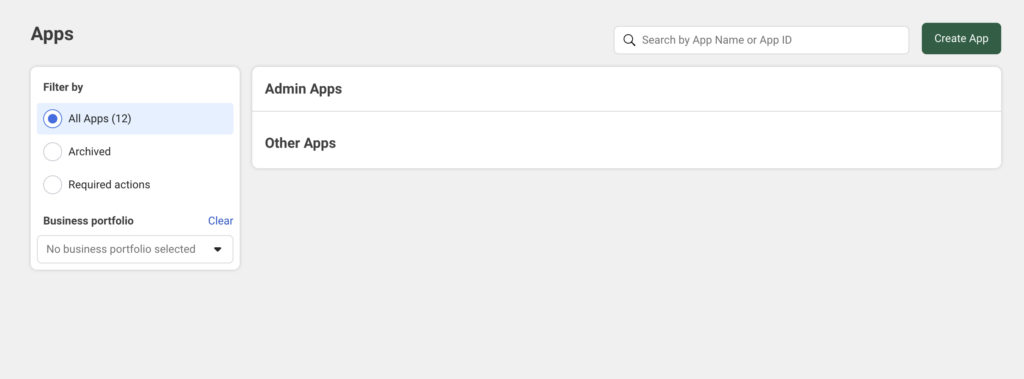
The WhatsApp numbers module in the Maker allows you to configure the WhatsApp numbers used in INO cx.
Note: you can reuse a number that is used for voice calls for WhatsApp interactions. You can also use the same number for both incoming and outgoing WhatsApp interactions.
The WhatsApp numbers module is divided into three tabs:
- WhatsApp numbers (for incoming numbers)
- Outgoing WhatsApp numbers (for outgoing numbers)
- META configuration (to link Meta application to INO cx)
Each tab has its own setup process and specific permissions.
1. Access and permissions
To access and configure WhatsApp numbers, the user’s role must include the appropriate rights in the Maker:
- WhatsApp Configurations: access, creation, modification, deletion — configure your Meta applications for WhatsApp Business
- WhatsApp numbers: access, creation, modification, deletion
- Outgoing WhatsApp numbers: access, creation, modification, deletion
These permissions are managed in the Roles module of the Maker.

2. Configure the WhatsApp number with META
Before adding numbers in INO cx, you must first configure the WhatsApp integration on the Meta side. Follow these steps based on Meta’s requirements.
2.1. Prerequisites
- Create a Facebook Business account for your company
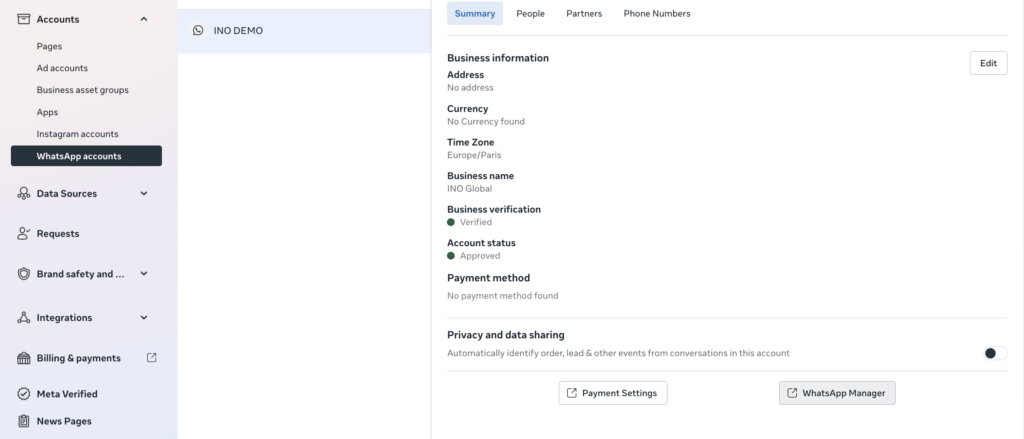
- Create a WhatsApp account: go to Business Settings > Accounts > WhatsApp Accounts and add a new account
- Once the WhatsApp account is created, go to Accounts > WhatsApp Accounts, select the account and click the WhatsApp Manager button
2.2. Create a META application
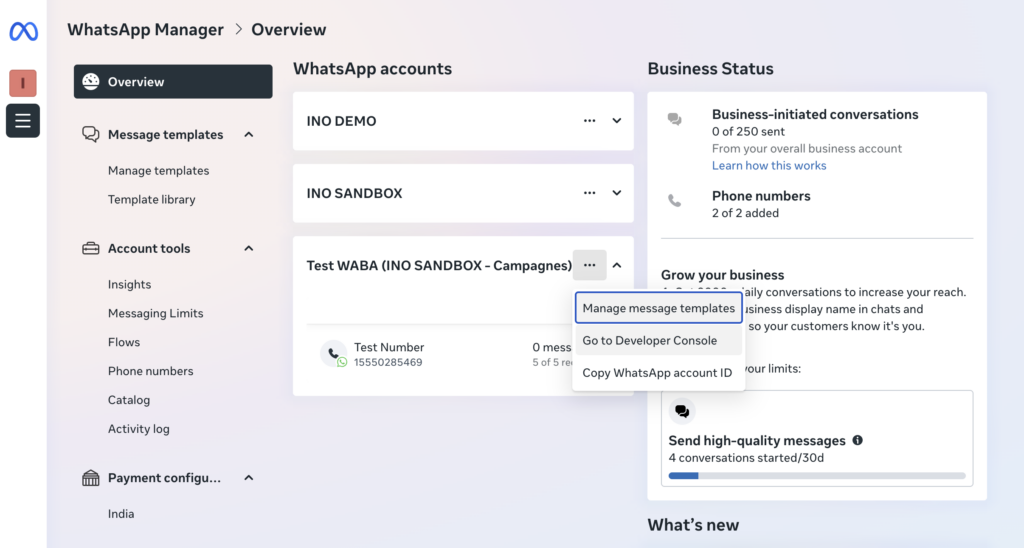
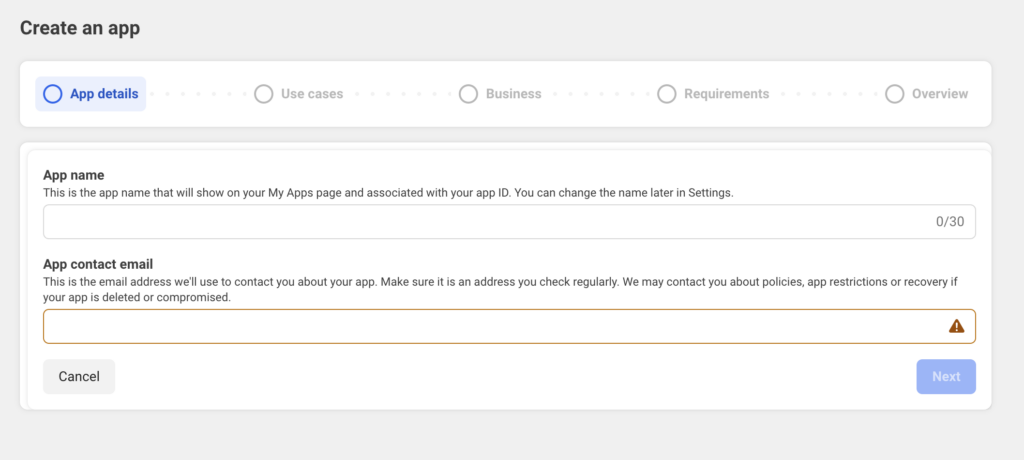
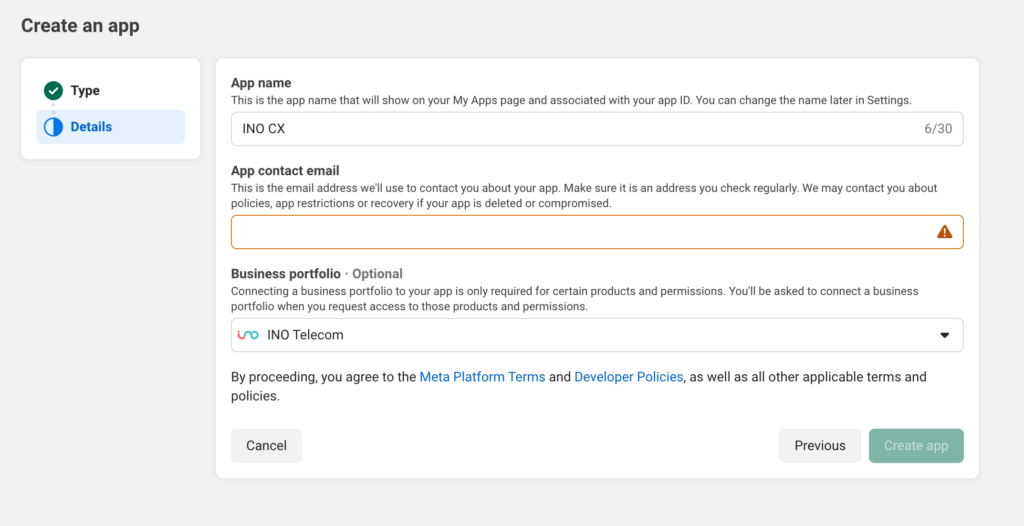
In the WhatsApp Manager > Overview > find the test number and click Go to Developer Console. Then, on the Apps page, click Create App.
- Fill out the form as follows:
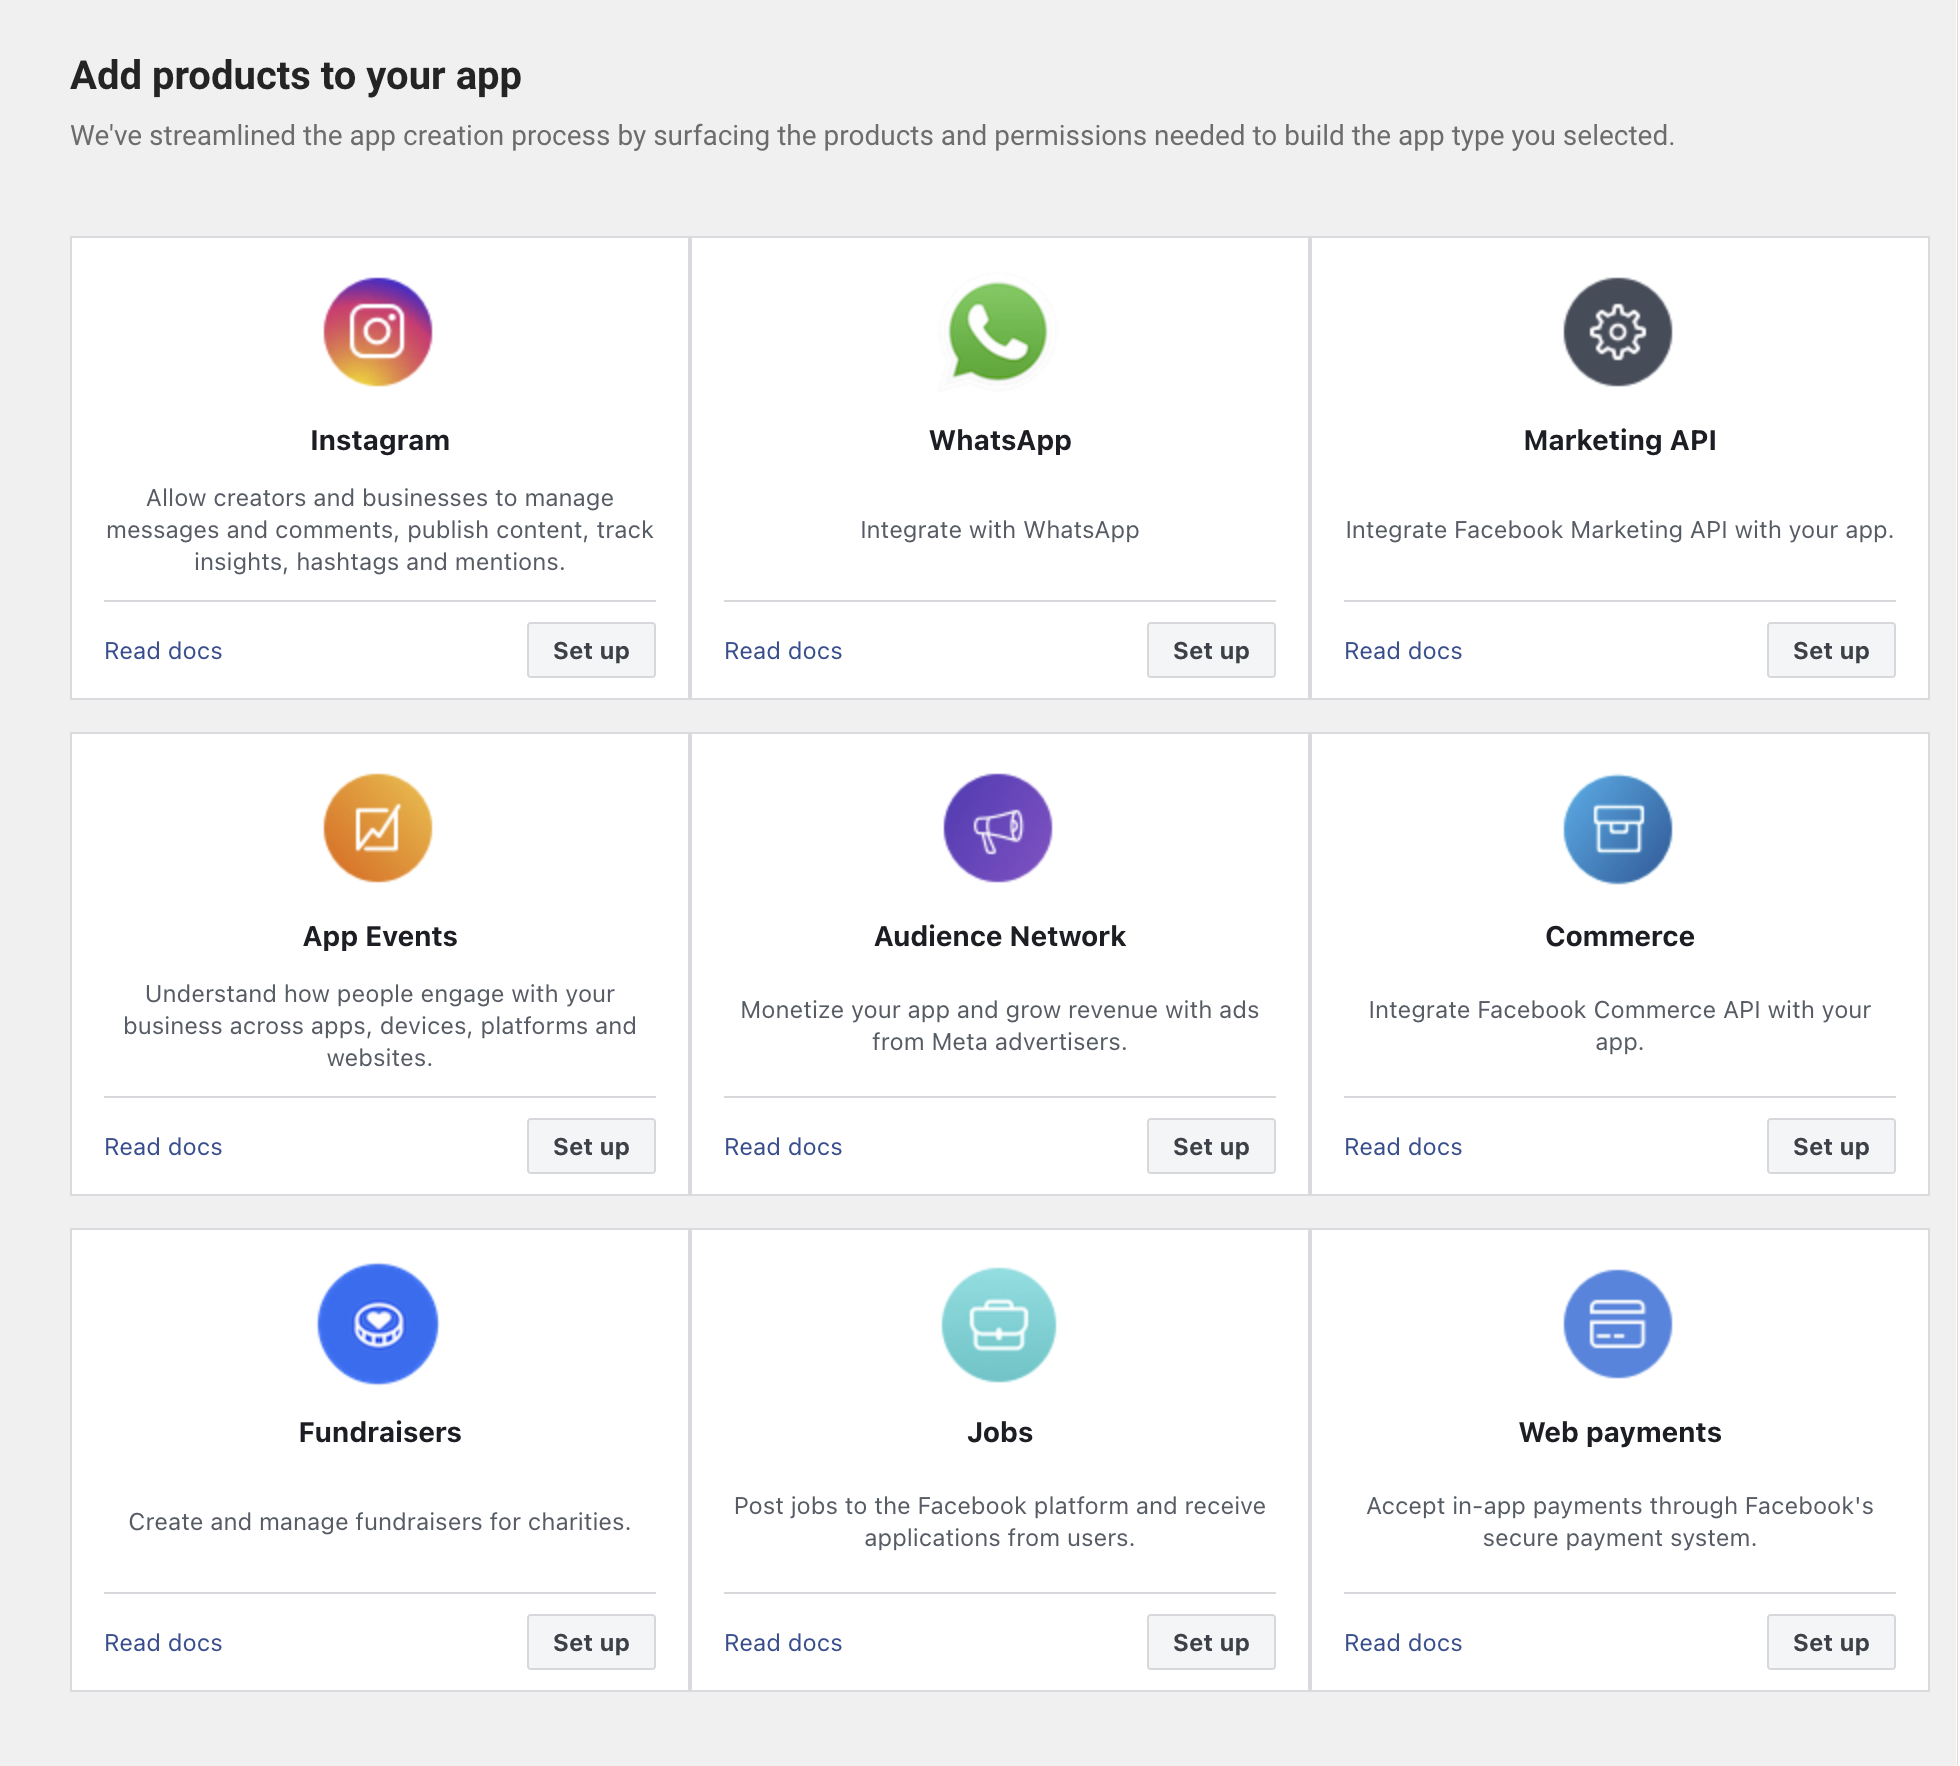
2.3. Configure the application products
Add the following two products to the application:
- The WhatsApp product: click Set up
- The Facebook Login for Business product: click Set up
2.4. Configure the webhook (WhatsApp product)
In the left menu, go to Webhooks. Select the product WhatsApp Business Account and configure the webhook URL and verification token as follows
➡️ For clients in Europe:
URL Webhook: https://v-prod-metawawh.ino.cx/webhook
Token: ask INO cx team.
➡️For clients in US:
URL Webhook: https://v-prod-metawawh.us-west-2.ino.cx/webhook
Token: ask INO cx team.
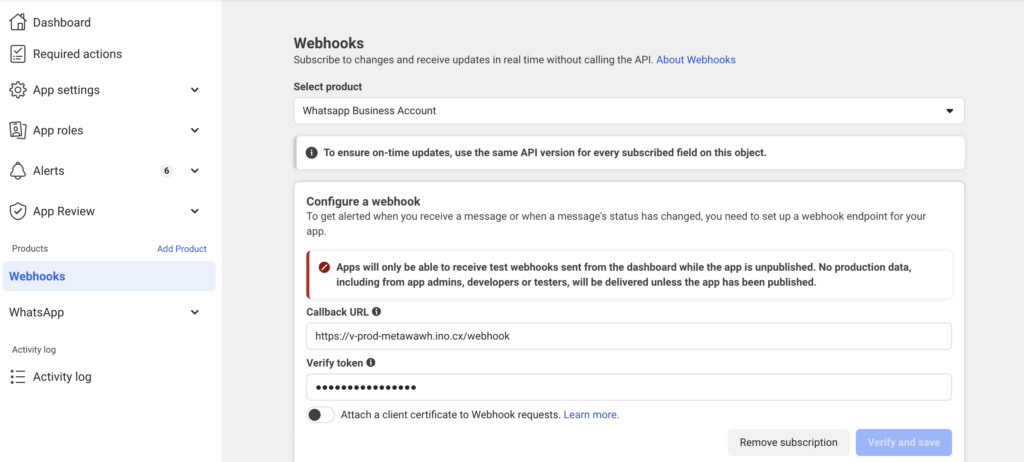
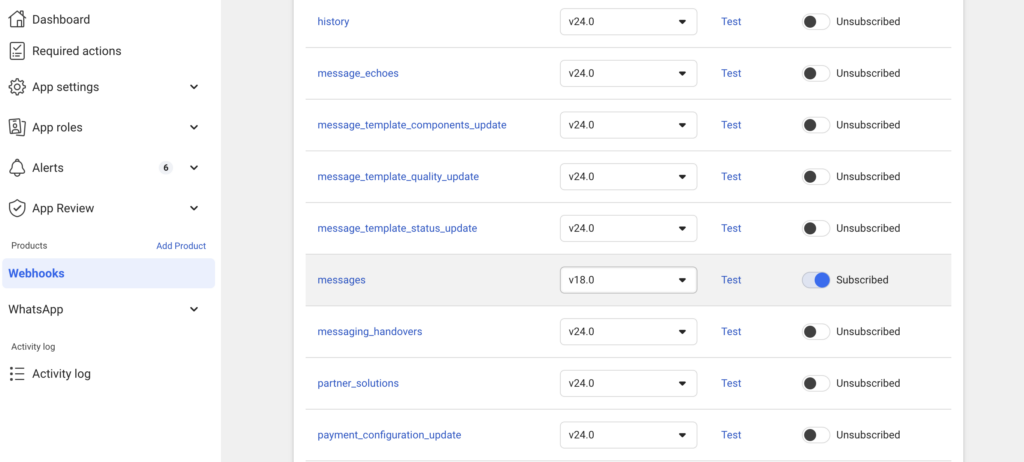
Once verified and saved, subscribe to the messages field of the webhook.
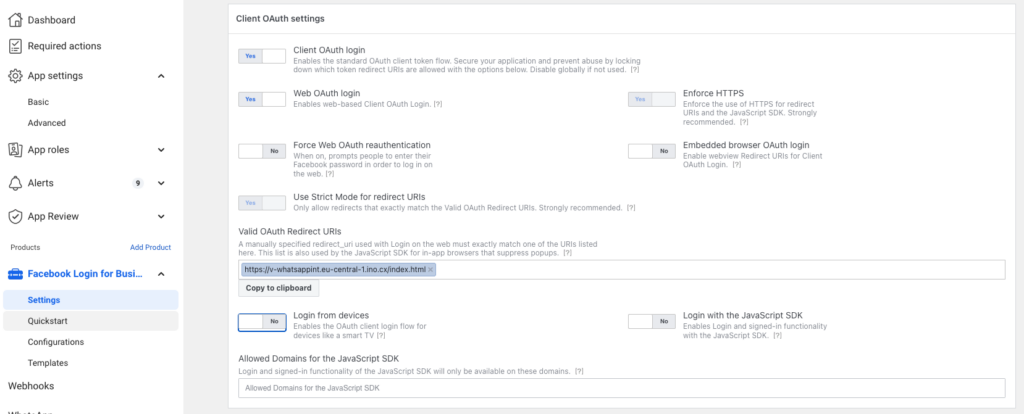
2.5. Configure Facebook login for business
Go to the Facebook Login for Business product in the left menu, then open the Settings submenu.
In the Valid OAuth Redirect URIs field, enter the following URL:
- for Europe: https://v-whatsappint.eu-central-1.ino.cx/index.html
- for US: https://v-whatsappint.us-west-2.ino.cx/index.html
2.6. Add a phone number
In the left menu, go to WhatsApp, then click Add a phone number.
⚠️ Each client must absolutely own any number they wish to add.
In WhatsApp > API Setup menu, click on Add a number.
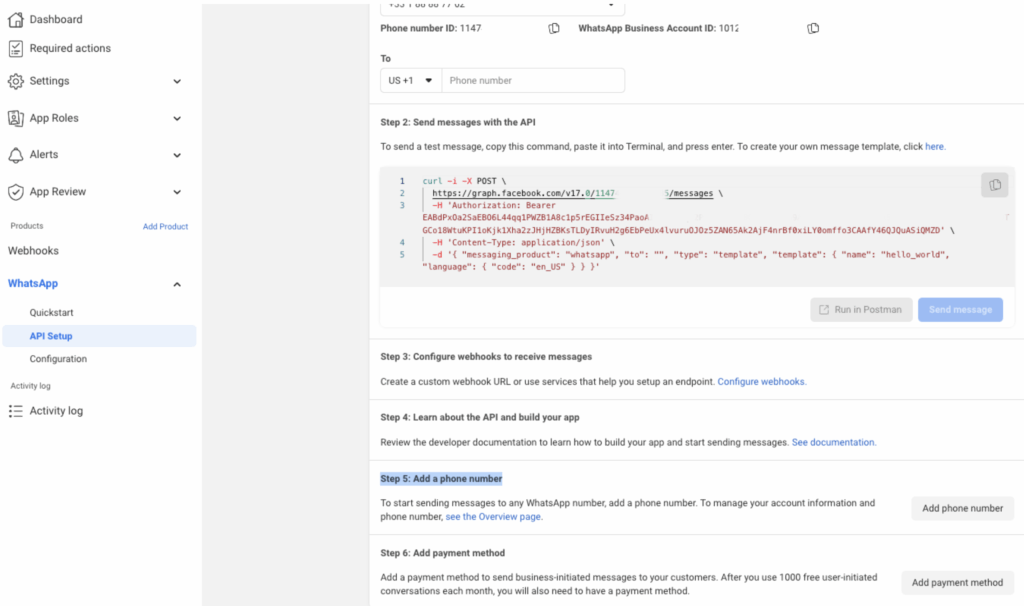

⚠️ A verification code will be sent by SMS or voice call to the provided number.
⚠️ You can only add 2 numbers per application if your company is not verified.
2.7. Create a system user
Once the application and number are created, create a system user in Meta to generate a permanent access token, required for the WhatsApp service with INO cx:
➡️ Select the created WhatsApp application.
➡️ Set the token expiration to Never
➡️ Grant the “whatsapp_business_management”, “whatsapp_business_messaging” and
“business_management” permissions
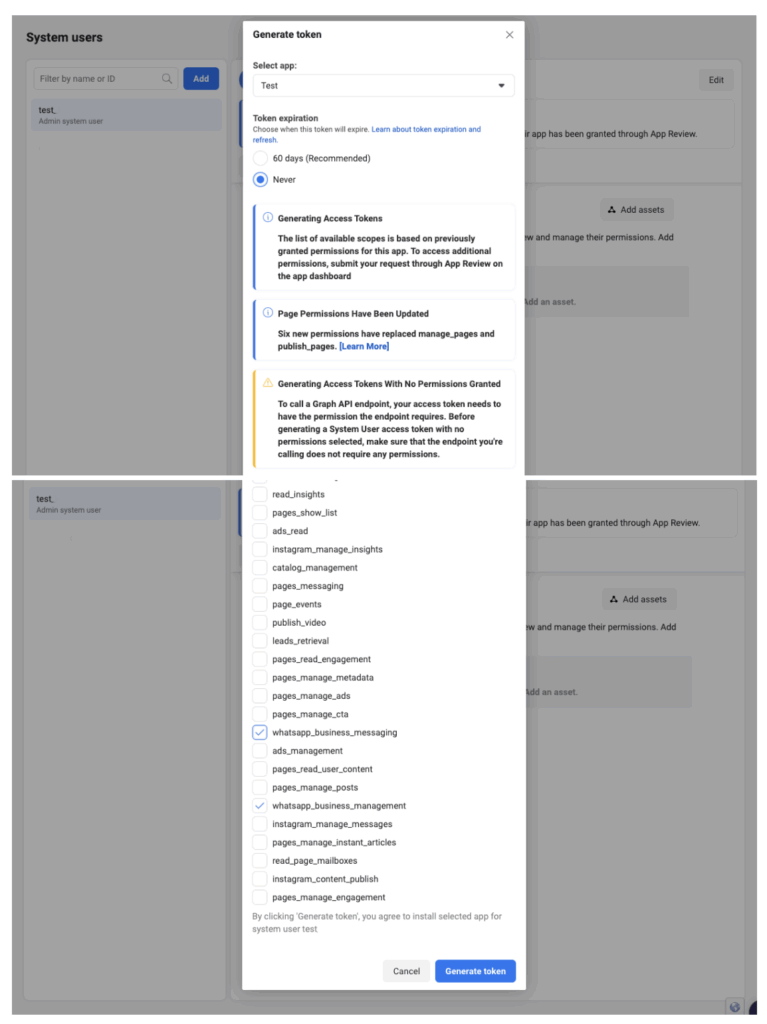
Assign the application as a resource to the system user. Select the application under Applications, then enable Manage app (full control).
Once done, the system user will be added to the application’s Roles as an administrator.
Save the token — Meta does not store it.
This token will be used when connecting numbers in INO CX.
⚠️ The client (end-user) must always initiate the WhatsApp conversation.
Additional costs apply if the company initiates the conversation.
See Meta billing terms.
3. Configure WhatsApp on INO cx
Once the Meta configuration is complete, you need to link your Meta application to INO CX and import your WhatsApp numbers.
3.1. Enable WhatsApp configuration rights
Go to Users > Roles in the Maker and enable the rights on the WhatsApp Configurations entity for the relevant role.

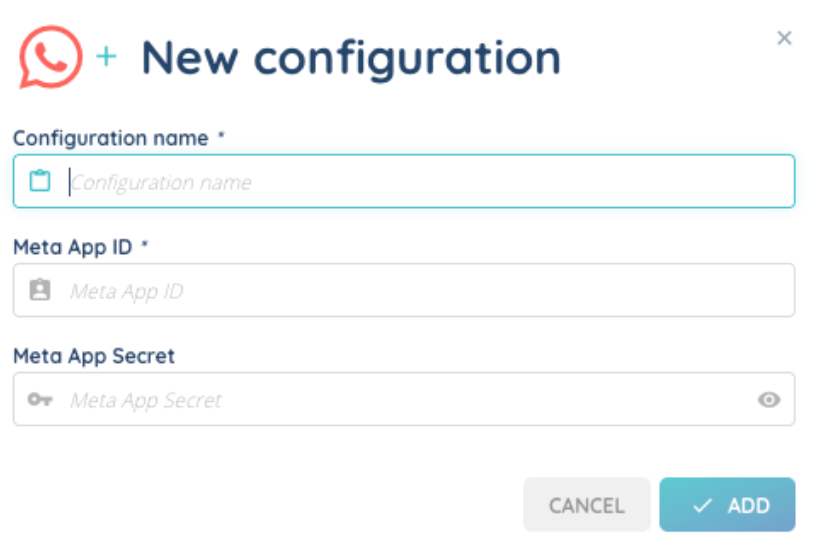
3.2. Add the META application information
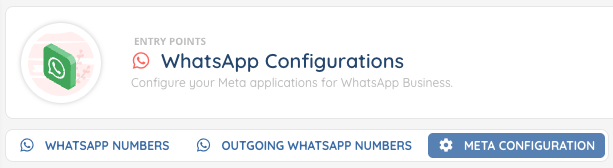
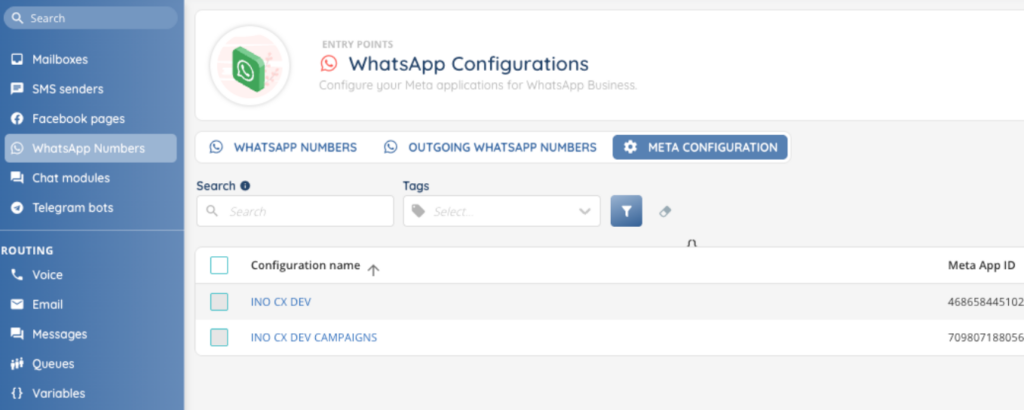
In the Maker, go to Entry Points > WhatsApp Numbers, then select the META Configuration tab.
Add a new configuration with the following information:
- Configuration name — a label to identify the application (e.g., “INO cx WA”)
- Meta App ID
- Meta App Secret
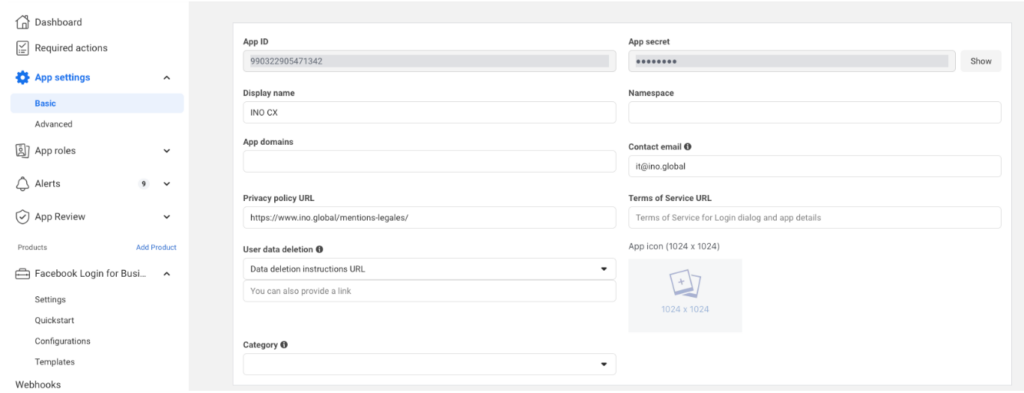
You can find the Meta App ID and Meta App Secret in the settings of your Meta application (App settings > Basic):
Once the configuration is saved, you can click on it and use the Test connection button to verify the link to your Meta application.
3.3. Add WhatsApp numbers on INO cx
Go to the WhatsApp Numbers tab (incoming or outgoing), then click the Open button in the top-right corner.
A Facebook Login for Business dialog window will open. Follow these steps:
- Reconnect your Facebook account to the INO CX application (or log into another account).
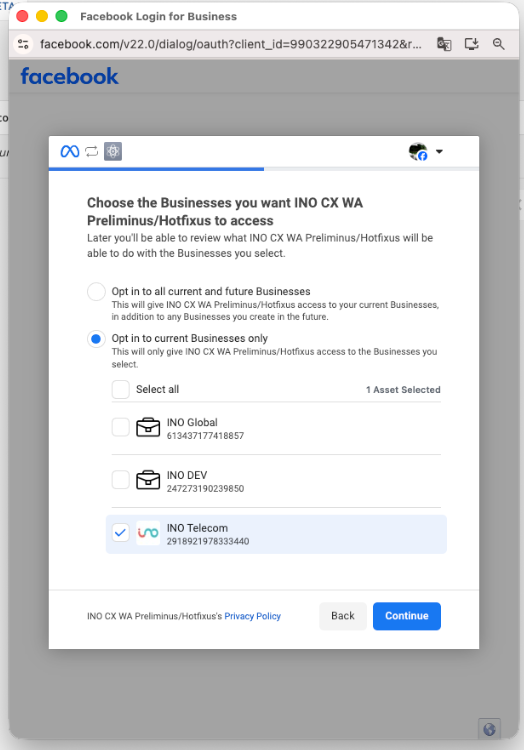
- Choose the Businesses you want INO cx to access. Select “Opt in to current Businesses only” and check the relevant business(es).
- Select the WhatsApp accounts (WABA) to connect, then click Continue. Once the dialog is validated, the numbers associated with the selected accounts will appear in the list.
3.4. Number statuses
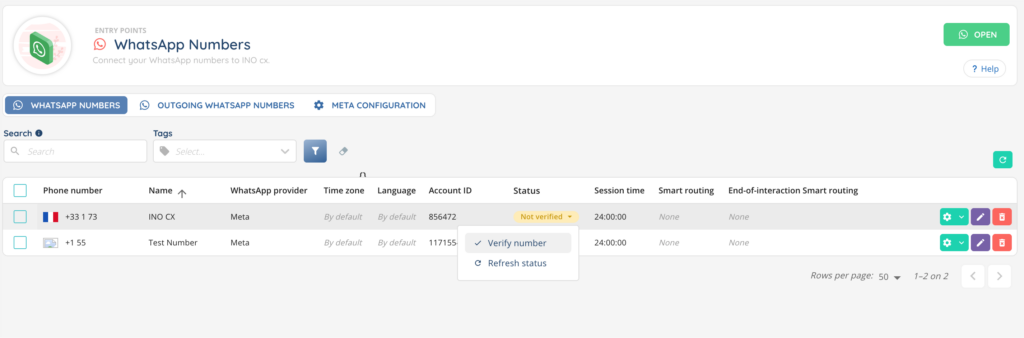
After importing numbers, they may not yet be active and may require additional verifications. A Status column in the numbers list indicates the current state of each number.
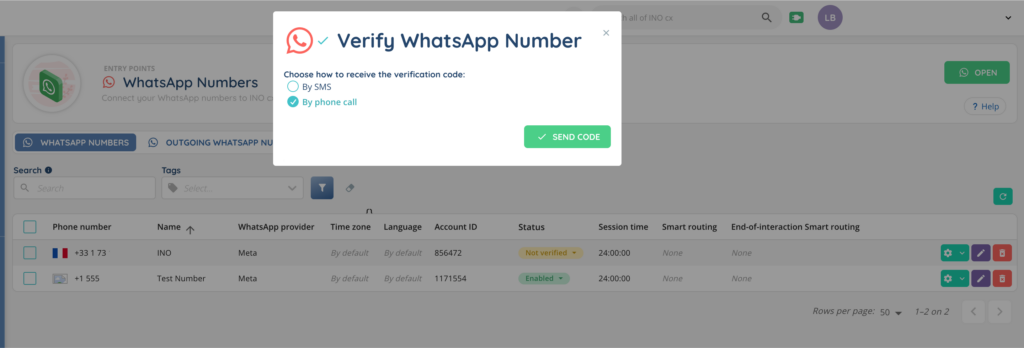
➡️ Unverified
If a number appears as Unverified, click on the status badge to reveal the action menu, then select Verify the number.
A dialog will appear asking you to choose how to receive the verification code: by SMS or by voice call. Enter the received code to complete the verification.
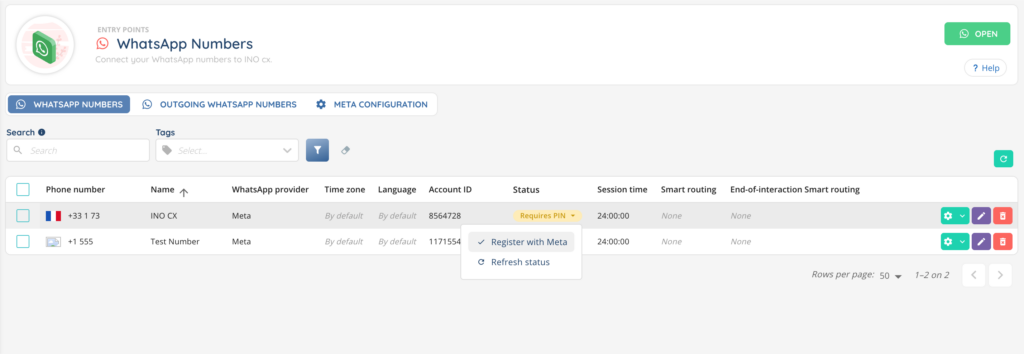
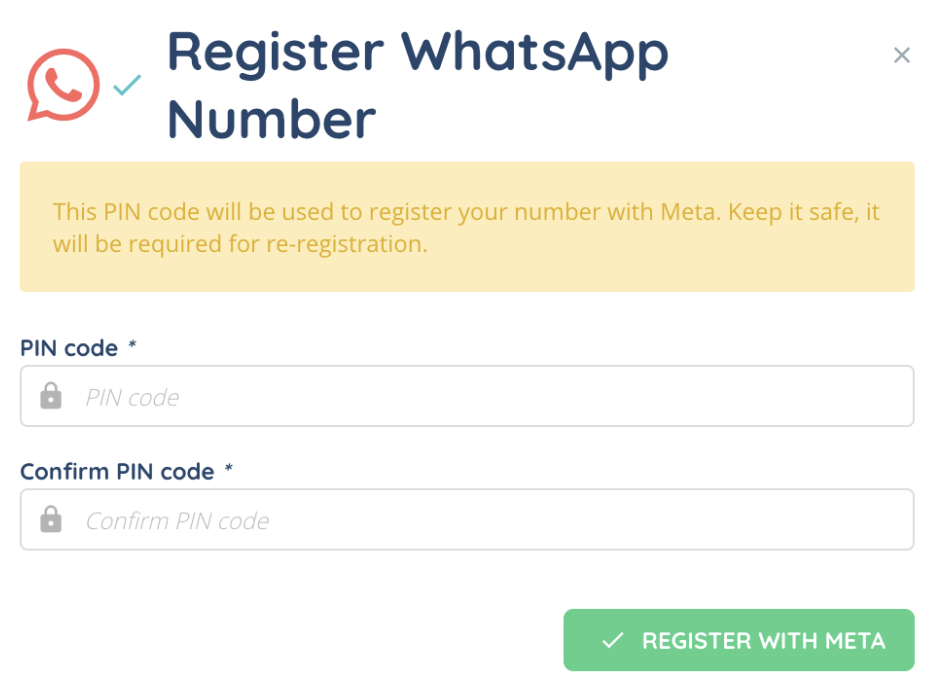
➡️ PIN required
If a number has the PIN required status, click on the status badge and select Register with Meta. A dialog will ask you to enter a 6-digit PIN code. This PIN will be used to register the number with Meta. Keep it safe — it will be required in case of re-registration.
➡️ Expired token
If the token applied to a number has expired, click on the status badge and launch the Refresh token action.
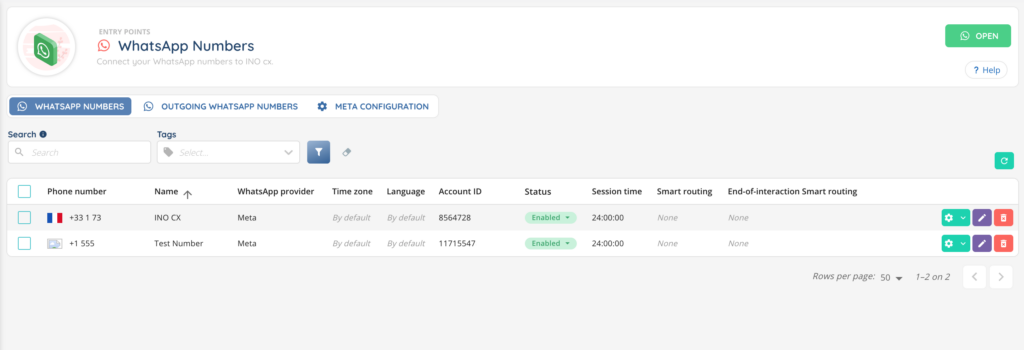
➡️ Activated
Once all verifications are complete, the numbers will appear with the Enabled status. You can then associate them with your Smart Routing and start testing.
3.5. WhatsApp numbers (incoming)
To add incoming WhatsApp numbers, use the Open button as described in section 3.3.
This tab lists all the incoming WhatsApp numbers already configured in your environment. Each line includes the following columns:
- Phone number
- Name
- WhatsApp provider
- Time zone
- Language
- Account ID
- Status
- Session time
- Smart routing
- End-of-interaction smart routing
At the end of each row, you’ll find three action buttons:
- ⚙️ Settings – view history, manage tags, and status actions
- ✏️ Edit – modify the number’s configuration
- 🗑️ Delete – remove the number
A search bar lets you quickly find a number by its name or phone number. You can also search using tags.
3.6. WhatsApp numbers (Outgoing)
Outgoing numbers are added through the same process as incoming numbers, using the Open button described in section 3.3. Once connected, they appear in this tab and can be edited or deleted.
The Outgoing WhatsApp numbers tab allows you to add and manage the numbers used by your agents to send outgoing WhatsApp messages.
➡️ Message templates on Meta
To contact a person who has never been contacted or has not been contacted for more than 24 hours, it is necessary to use message templates approved by Meta.
Templates can be created from the WhatsApp Business account interface.
There are three types of templates:
- Marketing
Flexible template to contact a client for brand awareness, sales, retargeting, app promotion, or customer relationship development.
⚠️ ForMarketingtemplates, a campaign opt-out button must be added. - Authentication
Used to authenticate a user, for example with an authentication code. - Utility
Triggered by a client action or request, for example to provide information about an ongoing order.
Note: incorrect template typing may result in rejection by Meta.
Once created, a template must be validated by Meta. Approval can take up to 24 hours. Possible statuses are:
- ✅ Approved (green check)
- 🟡 Pending review (yellow check)
- ❌ Rejected (red check)
Note: these statuses will appear when you create your WhatsApp campaign. See the article on campaigns for more information.
➡️ Pricing
WhatsApp fees are applied per conversation, not per individual message sent or received.
- Conversations are 24-hour chat threads between your business and your customers.
- Conversations are opened and billed when messages sent to customers are delivered.
- Pricing depends on the type of conversation (Marketing, Utility, Authentication) and the country.
For detailed pricing information, please contact Meta or read https://www.facebook.com/business/help/2225184664363779.