[Reading time: 5 minutes]
Overview
A Checkpoint is a marker placed on an interaction by a Smart Routing flow to record a milestone in the customer journey. Checkpoints are not interactive — neither the customer nor the advisor sets them manually: they are attached automatically when the Smart Routing tree runs through an Add a checkpoint action.
Each interaction can accumulate several checkpoints during its life. Once attached, the list of checkpoints is visible in the interaction details, with the date and the name of the action that set each one. This gives a clear, chronological trail of where the interaction has been in the routing.
Typical use cases include marking that:
- The interaction has passed a given identification step (recognised customer, opt-in collected, etc.).
- The customer was offered a callback or an upsell.
- The interaction reached a specific branch of the routing tree, for later audit or statistics.
- A campaign or A/B test target has been crossed.
1. Access and permissions
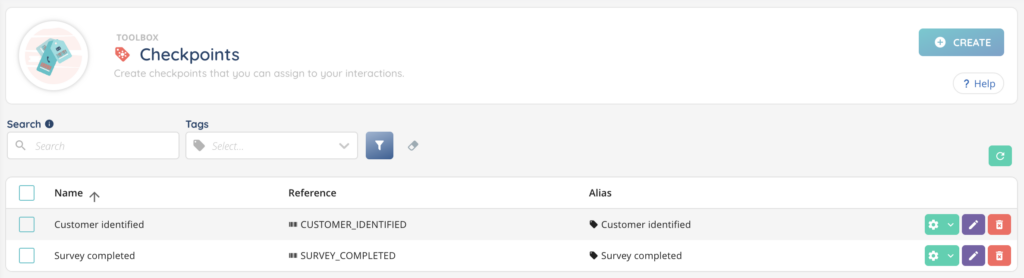
Checkpoints are configured in the Maker, in the Toolbox module. From the left menu, open Toolbox > Checkpoints.
To access and configure checkpoints, the user’s role must include the appropriate rights on the Checkpoints entity:
- Read – view the list and details of checkpoints.
- Create – create a new checkpoint.
- Modify – edit an existing checkpoint.
- Delete – delete a single checkpoint or several at once.
These permissions are managed in the Roles module of the Maker. Checkpoints are part of the Smart licence.
2. Create a checkpoint
To create a new checkpoint:
- Go to Maker > Toolbox > Checkpoints.
- Click the + button at the top right.
- Fill out the form:
| Field | Required | Description |
|---|---|---|
| Name | Yes | Display name of the checkpoint. |
| Reference | Yes | Unique identifier used to reference the checkpoint in your Smart Routings and integrations. Must be unique and may contain only the following special characters: _ + . @ - |
| Alias | No | Short label attached to the interaction when the checkpoint is set. The alias is what appears in the interaction’s tag list — choose something concise. |
- Click Save.
The new checkpoint appears in the list. It is now available to be added in a Smart Routing.
The list itself shows the columns Name, Reference and Alias. A search bar at the top lets you find a checkpoint by its name or reference.
3. Use a checkpoint in a Smart Routing
A checkpoint is set on an interaction through a Smart Routing action of type Add a checkpoint. The action is available in voice, email and messaging Smart Routings.
In the Smart Routing editor:
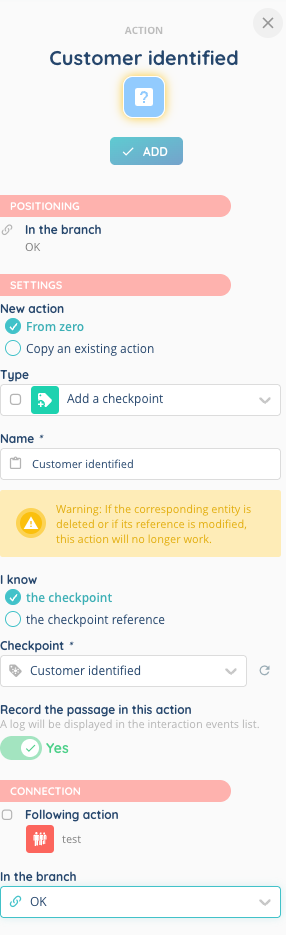
- Add an Add a checkpoint action to the routing tree, at the step where you want the checkpoint to be set.
- Pick the checkpoint to apply. You can either:
- Select the checkpoint directly from the list of checkpoints configured in the Toolbox, or
- Specify the checkpoint reference as a code — useful when the checkpoint is determined dynamically from a variable.
- Wire the outcome branches of the action.
The action has two possible outcomes that can be connected to different branches of the routing:
| Outcome | Meaning |
|---|---|
| OK | The checkpoint has been successfully attached to the interaction. |
| Reference not found | The provided checkpoint reference does not match any existing checkpoint (typically when the reference is built from a variable and the result does not exist). |
When the action fires, the system records on the interaction:
- The checkpoint Name and Reference.
- The Alias, which is also added to the interaction’s tag list.
- The exact timestamp when the checkpoint was attached.
- The Smart Routing action that triggered it (so you can trace which step set it).
The same checkpoint cannot be added twice to the same interaction — if a checkpoint is already attached, the action is ignored for that one and the routing continues on the OK branch.
4. Edit, duplicate or delete a checkpoint
From the Checkpoints list, each row provides the following actions:
| Action | Description |
|---|---|
| Edit | Modify the Name, Reference or Alias of the checkpoint. Changing the Reference will impact any Smart Routing action configured to use that reference as a code. |
| Duplicate | Create a copy of the checkpoint. The Name and Reference of the copy must be updated to keep references unique. |
| Delete | Remove the checkpoint. Before deleting a checkpoint that is still referenced by a Smart Routing action, detach it from the action first, otherwise the action will fall on the Reference not found outcome at runtime. |
Several checkpoints can be deleted at once by selecting them in the list and using the bulk delete action.
5. Where checkpoints appear on an interaction
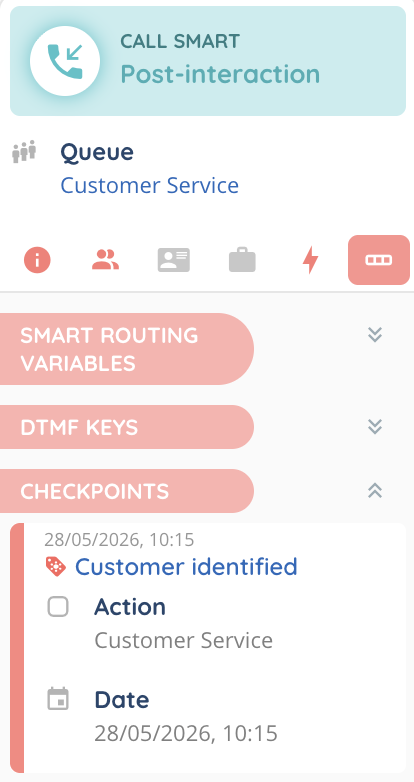
Once a checkpoint has been set, it is visible on the interaction itself:
- In the Checkpoints section of the interaction details, with the list of every checkpoint attached, in chronological order, the date and the name of the Smart Routing action that set each one.
- In the Information tab, a Checkpoints section showing the Alias of every attached checkpoint as a small tag chip. Useful to see the journey at a glance, on any interaction.
- In the Data tab of the interaction details page (in the interaction during interaction or in interaction history after interaction), the detailed list of every checkpoint attached to the interaction, in chronological order, with the date and time when it was set and the name of the Smart Routing action that triggered it. Each row links to the checkpoint configuration page.